

 |
Beltane 2009 |
 |
 |
 |
piece of pisces > neko manko chan > classique > be prepared >
what are you looking at? > little mary merkin > supurbia > mo' hair >
mer(maid)kin > fly fishing > dentata > high drama
Mama Cat (photo)
Anthony Ascione (model)
"Work places located in areas prone to natural phenomena... and subject to a 'substantial threat of release of hazardous substances' are covered by 1910.120. The emergency response plan required in 1910.120(q)(1) should include responses to emergencies caused by such natural phenomena. The requirements of the emergency response plan clearly state in paragraph (q)(1), that emergency response plans 'shall be developed and implemented to handle anticipated emergencies prior to the commencement of emergency response operations.' OSHA interprets this to mean that employers in areas prone to natural phenomena should anticipate whether such natural phenomena are likely to cause releases of hazardous substances and if so incorporate emergency response procedures to such natural phenomenon in their emergency response plan."
—Patricia K. Clark, Director, Directorate of Compliance Programs, U.S. Department of Labor, Occupational Safety & Health Administration [Emphasis mine.]
Always be prepared for a release of hazardous substances. Especially if you're prone.
Suggested Reading
Condoms and STDs: Fact Sheet for Public Health Personnel
from the Centers for Disease Control and Prevention
Difficulty
Boy Scout Dropout
Click here for definitions of difficulty levels.
Finished Measurements
An equilateral triangle, approximately 5"/11.9cm on each side.
Download
Safety First! Pattern (pdf format)
Materials
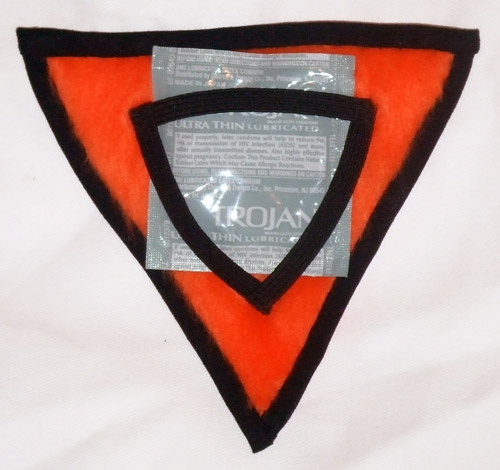
Anthony Ascione (photo)
click image to enlarge
- remnant bright orange faux fur
- 1 package black double fold bias tape, .25"/.9cm wide
- 7.5"/19cm black elastic, .25"/.9cm wide
- scissors
- ruler
- clear nail polish
- black sewing thread
- hand sewing needle
- soft bristled hair brush
- 3 jumprings (optional)
- condom in its wrapper
Design Notes
If you can't find orange faux fur in your local fabric store's remnant bin, buy the smallest amount they'll cut from the bolt. Then you can outfit your whole crew for a safer-sex promotional event!
This project is hand sewn. I found that a sewing machine isn't much help when working with faux fur on such a small scale.
Cut the Faux Fur:
Download, print, and cut out the Safety First! pattern. Lay the pattern on the back of the faux fur, aligning the pattern so that the fur lies toward one point (this will be the bottom point). Trace the pattern onto the back of the fur, and cut the piece out. Gently remove and discard the loose fluff from the top of the fur triangle.
Sewing on the Bias Tape Edging:
Commercially made double fold bias tape is made so that one folded edge is just a bit shorter than the other edge. This side is intended to go on the front of the project, so that you can "stitch in the ditch", that is, carefully sew inside the seam on the front, to sew down the back side. We aren't going to stitch in the ditch on this project, but still make sure you have the correct side of the tape on the front. It will make it easier to make a neat job of it.
Cut a piece of bias tape about 7"(17.8cm) long. Open up the shorter folded edge, and match the raw edge of the bias tape to one side edge of the fur, on the front. With small stitches, sew a neat running stitch along the crease of the bias tape, knotting the thread securely at each end.
Fold the bias tape along the stitching, but keep the center fold open. Trim the ends of the bias tape to about .5"/1.9cm beyond the points of the triangle. Neatly wrap the ends of the bias tape around the points of the triangle, and fold the bias tape along the center fold, so that it covers the edge of the fur.
Now we're going to sew down the back folded edge of the bias tape with what amounts to a running stitch, but we're going to sew the stitch a little differently. Thread your needle and knot the end of the thread. Slip the point of the needle into the folds of the bias tape at one end, so that it emerges from the end of the folded edge, and the knot hides neatly inside the folds of bias tape.
Remember when you were in second grade and you grossed your friends out by taking a T-pin from the classroom bulletin board and sticking it under the top couple layers of skin on your fingers? That's essentially what we're going to do here. On the back of the fur, you should be able to see the running stitch from sewing the bias tape to the front of the fur. Along this same line, right next to where the thread comes out of the bias tape, slip the point of the needle just under the threads that make up the base fabric of the fur. Bring the needle back up about 1/8"(.5cm) farther along the stitching line, and draw the stitch snug. This keeps you from carrying the thread over the fluffy part of the fur, making an ugly, visible stitch on the front.
Now, right next to where the thread comes out of the fur, stick the needle into the folded edge of the bias tape, then back out about 1/8"(.5cm) further along the fold. Continue in this fashion until the entire length of bias tape is neatly sewn down. Make a neat knot at the end of the seam, slip the needle inside the seam, then out through the bias tape an inch away from the knot. Gently tug the thread taught, trim close the to the fabric, and let the end of the thread slip back inside the bias tape, for a neat finish.
Repeat this process to cover the other side edge, and then the top edge of the fur triangle. Keep your seams and knots as neat as possible, both on the front and the back. You don't want rough knots rubbing your skin when you wear your merkin.
The Elastic Triangle:
Cut three pieces of elastic 2.5"/6.9cm long, making sure to cut the ends neatly square. Dab a bit of clear nail polish on the cut ends to seal them from raveling. Once the polish is dry, stitch the three pieces together into a triangle. Make sure your knots are all on the same side of the triangle. Don't worry about getting the angles right—I just sewed them at 90 degrees. It's elastic, it'll flex.
Center the elastic triangle on the fur triangle, with the knots against the fur. Thread your needle and knot the end of the thread. Slip the needle under one corner of the elastic triangle and through the fur, so that the knot is hidden between them. Taking a tiny stitch, bring the needle back up through both the fur and the elastic. Sew just the corner of the elastic triangle firmly to the fur with a few small stitches. Bring the needle back out between the elastic and the fur, and make the finishing knot between them, hiding it as best you can. Repeat this for the other two corners of the elastic triangle.
Finishing:
With a soft bristle hair brush, gently brush against the grain of the fur along the two side edges, so that the fur that got caught in the edging seams is freed. Once free, brush the fur to the sides. Carefully trim the fur where it overlaps the bias tape. We want our fur to be fluffy, but not untidy. Once trimmed, brush it back in the correct direction.
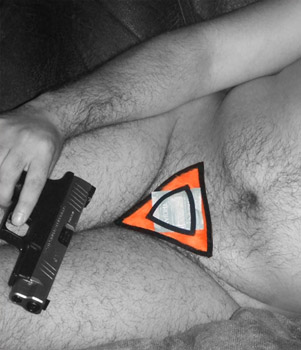
Apply the merkin to smooth, hairless skin with spirit gum, or, optionally, sew a small jumpring to the back of each corner, to which to tie thin ribbons or monofilament line, g-string style. Finally, slip a fresh, wrapped condom under the elastic bands, so you'll always have your safety gear handy in case of a spontaneous release of hazardous substances.
About
 contact Carin:
• legal info
contact Carin:
• legal info
![]()
home • antifesto • archive • errata • masthead • angstylvania • legal