

 |
Beltane 2009 |
 |
 |
 |
piece of pisces > neko manko chan > classique > be prepared >
what are you looking at? > little mary merkin > supurbia > mo' hair >
mer(maid)kin > fly fishing > dentata > high drama
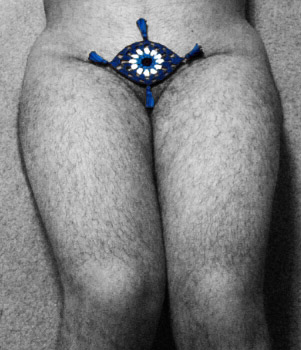
Mama Cat (photo)
Anthony Ascione (model)
The "evil eye" is a (sometimes unintentional) curse caused by someone praising or gazing in envy at something that belongs to another, whether it be a child, a stock animal, a fruit tree, or anything else. The effect of such a curse is characterized by the afflicted drying up and withering away. According to various cultures, the evil eye can be averted by spitting on the person or thing that has just been praised, by displaying a blue eye shaped charm, or by certain hand gestures which represent the act of sex.
When you're getting ready to perform your own sexual gestures, why not employ a protective eye to safeguard what's nearest and dearest to you?
Just keep the spitting consensual.
Suggested Reading
"To Celia"
translated by Ben Jonson
Difficulty
Coquette
Click here for definitions of difficulty levels.
Finished Measurements
Approximately 3"/7.6cm W x 4"/10.2cm H.
Materials
- J & P Coats 6-strand embroidery floss [100% Mercerized Cotton, 8.75 yds/8 meters per skein] Color 8403 (or DMC 310 Black), 1 skein
- J & P Coats 6-strand embroidery floss [100% Mercerized Cotton, 8.75 yds/8 meters per skein] Color 7010 (or DMC 3843 Electric Blue), 1 skein
- J & P Coats 6-strand embroidery floss [100% Mercerized Cotton, 8.75 yds/8 meters per skein] Color 1001 (or DMC White), 1 skein
- J & P Coats 6-strand embroidery floss [100% Mercerized Cotton, 8.75 yds/8 meters per skein] Color 7023 (or DMC 797 Royal Blue), 2 skeins
- Size 4/2mm steel crochet hook
- Scissors
- Tapestry needle
- A 2" wide strip of cardboard
- A ruler (optional)
- A ballpoint pen (optional)
- Towel, for blocking
- Sewing pins (at least a dozen), for blocking
- A clothes hanger
- A pencil
- A piece of paper
- Flesh toned felt, one square
- Hand sewing needle with large enough eye for one strand of floss
- 4 jump rings (optional)
Gauge
Your first round (the black "pupil") should measure about 3/4" across. (It's hardly worth crocheting a 4" square to gauge something so small.)
Design Notes
Crochet this project using all six strands of floss, just as it comes from the skein.
This project is worked in the style of a granny square; that is, after the 2nd round, stitches are worked in the chain spaces (notated as "ch sp"), crocheting around the chain, rather than through it.
Rounds 2, 3, and 4 are each done in a different color than the previous round. In each case, the ends of the previous round are joined with a slip stitch of the next round's color, by putting the hook through the 3rd chain from the beginning of the round, picking up a loop of the new color on the hook, leaving a tail a few inches long, and completing the slip stitch. The ends of the two colors can be neatly knotted before being woven in, or not, as you prefer. If you choose not to knot them, you may have to go back and tug the tails a bit before weaving the ends in, to tighten the slip stitch up properly.
When weaving ends in, try to run the tails along the top of the row crocheted with that color. If, for instance, you run a white tail along the top of a blue round, it will show in the chain spaces. Running the white tail along the top of the white row will hide it nicely.
If you finish the crocheted motif so that it looks neat from both sides, you could starch and block it to hang as an ornament to protect your home or car against the evil eye, rather than applying it to your nether regions.
US terminology is used for all instructions. (Click for US to UK conversions.)
Special Techniques:
Magic ring: http://crochetme.com/Dec_Jan_0405/reads_round.html
Quadruple Crochet: http://www.wonderhowto.com/how-to/video/
how-to-crochet-the-quadruple-crochet-stitch-217517/
Picot: http://crochet.about.com/od/learnmorestitches/ss/picothowto.htm
Crochet the Eye:
Rnd 1: With color 8403 (Black), make a Magic Ring. Ch 3 (counts as first dc), dc into ring 11 times. With color 7010 (Electric Blue), sl st to 3rd ch from beginning. (12 dc total) Pull ring tight.
Rnd 2: Ch 4 (counts as first dc + ch 1), 2 dc in 1st st, ch 1, *2 dc in next st, ch1, repeat from * in next 9 sts, dc in last st. With color 1001 (White), sl st to 3rd ch from beginning. (24 dc with 12 ch sp total)
Rnd 3: Ch 3 (counts as first dc), 2 dc in 1st ch sp, ch 2, *3 dc in next ch sp, ch2, repeat from * around. With color 7023 (Royal Blue), sl st to 3rd ch from beginning. (36 dc with 12 ch sp total)
Rnd 4: Ch 6 (counts as first dc + ch 3),
in first ch sp, 4 dc, ch 3,
in next ch sp, 4 dc, ch 3,
in next ch sp, 2 dc, 2 tc, ch 3,
in next ch sp, 2 tc, 2 qc, ch 3,
in next ch sp, 2 qc, 2 tc, ch 3,
in next ch sp, 2 tc, 2 dc, ch 3,
in next ch sp, 4 dc, ch 3,
in next ch sp, 4 dc, ch 3,
in next ch sp, 2 dc, 2 tc, ch 3,
in next ch sp, 2 tc, 2 qc, ch 3,
in next ch sp, 2 qc, 2 tc, ch 3,
in last ch sp, 2 tc, dc, sl st to 3rd ch from beginning
(48 stitches not including chains, with 12 chain spaces total)
Rnd 5: Ch 3 (counts as first dc)
in first ch sp, 4 dc, ch 3,
in next ch sp, 5 dc, ch 3,
in next ch sp, 5 dc, ch 3,
in next ch sp, 3 dc, 2 tc, ch 3,
in next ch sp, 2 tc, qc, picot, qc, 2 tc, ch 3,
in next ch sp, 2 tc, 3 dc, ch 3,
in next ch sp, 5 dc, ch 3,
in next ch sp, 5 dc, ch 3,
in next ch sp, 5 dc, ch 3,
in next ch sp, 3 dc, 2 tc, ch 3,
in next ch sp, 2 tc, qc, picot, qc, 2 tc, ch 3,
in last ch sp, 2 tc, 3dc, ch 3, sl st to 3rd ch from beginning.
(62 sts not including chains and 2 picots, with 12 chain spaces total)
Finish off and use tapestry needle to weave ends in.
Make the Tassels:
Neatly fold the strip of cardboard from the cereal box in half lengthwise, so that it is 1" wide. (It may help to score it with a ruler and a ballpoint pen.) Lay an 8" length of color 7023 (Royal Blue) floss inside the fold.
Cut 2 pieces of the same color about 28" long, and one piece of color 7010 (Electric Blue) the same length. Holding the three pieces of floss together, wrap them around the folded cardboard 10 to 12 times.
Draw the ends of the piece of floss inside the folded cardboard up around the wound floss, and tie it tightly with a square knot. Slide the wrapped and tied floss off of the cardboard, but don't cut the loops, yet!
Cut another 8" piece of color 7023 (Royal Blue) floss, and tie it tightly around the loops about 1/4" below the first tie, again with a square knot.
Cut the loops at the farthest point from the ties. Lay the ends of the second tie toward the cut ends, and trim all ends even.
Make three more tassels in the same way.
Block the Eye and Tassels:
Fold the towel into at least four layers and lay it somewhere it won't be disturbed for at least a day. If necessary, gently wash the crocheted eye in cold water with a little laundry detergent mixed in it, then rinse the eye thoroughly. Otherwise, just get it soaking wet in cold water. Block the eye on the towel, using the pins to keep it in place while it dries. Make sure the center of the eye remains round, not oval.
Soak the tassels in cold water. Tie them loosely to a clothes hanger, and make sure all the ends of floss lie straight and smooth. Hang the hanger up somewhere out of the way.
Leave the eye and tassels undisturbed for a day, or until they are completely dry.
Assembly:
With a pencil, trace the eye onto a piece of paper, making the corners pointed, rather than going around the picots. Cut this pattern out, then trace it onto the felt. Cut the piece out of the felt.
Tie one tassel to each corner and each side of the eye, leaving just enough slack that the tassels can swing freely. Weave the ends of the ties into the crochet.
Thread the sewing needle with a single strand of color 7023 (Royal Blue), and use it to carefully whip stitch the edge of the crocheted eye to the edge of the felt piece, including stitching the picots to the points of the felt.
Wearing:
The merkin can be worn with the corners of the eye vertical or horizontal. Apply it to smooth, hairless skin with spirit gum, or, optionally, sew a small jumpring behind each tassel, to which to tie thin ribbons or monofilament line, g-string style.
About
 contact Carin:
• legal info
contact Carin:
• legal info
![]()
home • antifesto • archive • errata • masthead • angstylvania • legal