

 |
Beltane 2009 |
 |
 |
 |
piece of pisces > neko manko chan > classique > be prepared >
what are you looking at? > little mary merkin > supurbia > mo' hair >
mer(maid)kin > fly fishing > dentata > high drama
Anthony Ascione (photo)
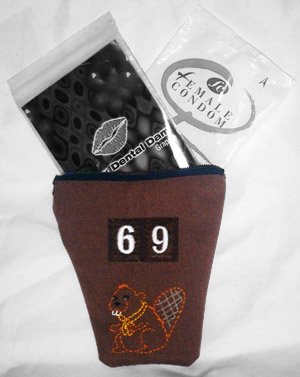
A good Beaver Scout is always prepared for whatever the world might throw at them, but that can be difficult when you dont have a place to stash your stuff. The beaver scout merkin has enough space for a condom (male or female), lube, or even a mini vibe for a night on your own.
Suggested Eating
Traditional S'mores, or just pour some marshmallow creme and chocolate syrup onto a lickable body part. Girl Scout Cookie season? Even better, you can fit a few into this pouch as bait....
Difficulty
Boy Scout Dropout
Click here for definitions of difficulty levels.
Finished Measurements
4.5"/11.4cm W at widest point x 4"/10.2cm H
Download
Be Prepared Pattern (pdf format)
Materials
- Scraps of woven cotton or cotton blend fabric in light brown, dark brown, or green (or an old scouting sash that can be cut up)
- Machine sewing thread the color of your fabric
- 5 zipper in the color of your fabric
- Transfer paper for dark fabrics
- Embroidery thread in assorted colors
- Embroidery needle
- Iron-on troop number patches (can be found at your local Girl Scout store or at the online Boy Scout store)
Prepare:
Print out the Be Prepared Pattern. Cut out the beaver embroidery guides and decide which one you want to use. Cut out the Front/Back pattern for later.
Embroider the Beaver:
Using transfer paper, transfer the beaver design onto your fabric. Embroider the design onto the fabric using the thread colors and stitches of your choice. I backstitched most of the design with 2 strands of thread due to the size. The threads on the tail are actually long stitches that are woven in a basket pattern with each other.
Sew the Merkin:
Once your beaver is stitched onto your fabric, cut a Front and a Back out of your fabric using the Front/Back pattern as a guide. With right sides facing, machine or hand sew the bottom three edges together. Turn piece right-side out and sew the zipper along the top edge. Iron your pouch so that the edges are nice and sharp. Iron-on your troop numbers. If you're worried about them peeling off while you're roughing it, whipstitch around the edges after ironing them on.
Earn that Badge!
If you're clever and leave yourself some space between your beaver and your troop number, you'll have a little room to place merit badges as you earn them.
About
 contact Robyn:
• legal info
contact Robyn:
• legal info
![]()
home • antifesto • archive • errata • masthead • angstylvania • legal