

 |
 |
 |
 |
 |
 |
 |
 |
los pequeñeos relojes de arena > mmm... brains.... > calabaza tallada >
conmemoración > calacas de arcilla > huesos deliciosos >
las calacas danzantes > sweet satisfaction > calavera charts >
magdalenas de muertos > he sees you when you're sleeping
Zabet Stewart (photo)
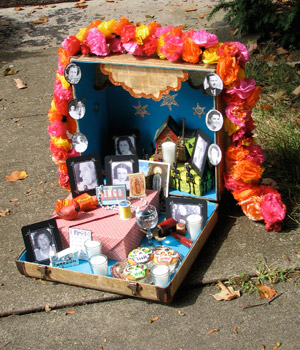
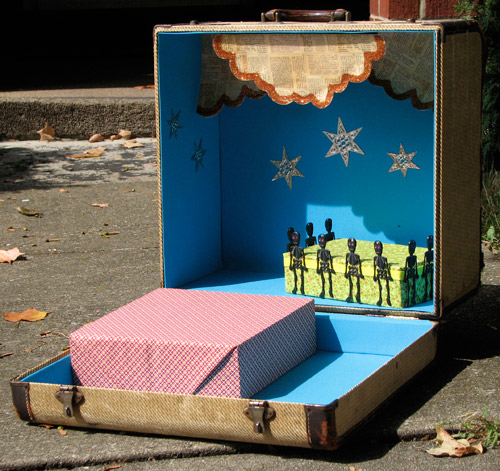
In the past couple of years, several close family members and friends I considered family died. Boxing up my pain seemed logical at the time, but as I explore truly what each of these people meant to me, I find that remembering how each of them touched my life is achingly satisfying. At a loss for the space a truly great Day of the Dead altar requires, I created this portable box of memories to soothe my pains.
Suggested Reading
Altars and Icons: Sacred Spaces in Everyday Life by Jean McMann
Difficulty
AntiCraft Superstar
Click here for definitions of difficulty levels.
Finished Measurements
Depends on your own case, but mine is approximately 17"/43.18 cm W x 20"/50.8 cm H x 10"/25.4 cm D.
Download
Deep Mourning Frame Template (pdf format)
Cloud Inserts, Oval Frame, and Punched Star Templates (pdf format)
Materials
- Vintage suitcase in a size to your liking
- Scissors
- Ruler
- Hobby knife
- Pencil
- Fabri-tac glue
- Bone folder
Feet
- Dowel rod, .75"/2cm in diameter
- Small handsaw
- Medium and fine grit sandpaper
- Acrylic craft paint in the color of your choice
- Paintbrush
- 4 1"/2.5cm wood screws (washers optional)
- Screwdriver with head to match screws
- Electric drill (optional)
Lining
- Fabric for lining - size will vary depending on size of suitcase (I used 1.5 yards.)
- Thin cardboard or bristol board to mount fabric on
- Heat n' Bond ultra hold iron-on adhesive
- Iron
- Devcon 2 ton epoxy - amount needed will depend on size of case (I used two tubes.)
Cloud Inserts
- Template
- White cardstock
- Printed vellum paper
- Thick white glue
- Orange glitter
- Three thin cardboard strips 1"/2.54cm H x 7"/17.8 cm W
- Three card stock hinges 2"/5.1 cm H x 7"/17.8 cm W
- Three heavy books, like phone books
Punched Stars
- Template
- Embossing metal, medium weight pewter
- Craft hole punch with 1/16"/1.58 mm, and 1/8"/3.18 mm heads
- Small hammer
Fabric Covered Boxes
- Wooden or cardboard boxes, any size (cigar boxes work nicely)
- Fabric, sized large enough to generously wrap around the box (fat quarters work fine)
- Clothespins (optional)
Skeleton Ribbon
- Grosgrain ribbon
- Plastic skeletons
- Colored nail polish
Deep Mourning Frames
- Frame template
- Black cardstock
- 3"/ 7.6 cm x 4"/10.2 cm photos
- Silver marker
- Corner rounder punch
Oval Mourning Frames
- Oval template
- Photos, approximately 2.5"/6.35 cm x 3.5"/8.89 cm
- 9mm jump rings
- Thick white glue
- Black glitter
- Corsage pins
Paper Flower Garland
- Tissue paper in red, pink, orange, and yellow
- Pinking shears
- Pipe cleaners
- Wire cutters (optional)
Design Notes
Special thanks to Edith Cummings and Kirsten Weaver for creating what seemed to be millions of paper flowers for this project. Extra thanks to Edith for also writing the instructions for them.
This project can take a weekend to make if you have all the supplies ready, or a whole month if you want to pace yourself and collect materials that really speak to you. It can be as fancy or as no frills as you want to make it. There is a lot of freedom in this project because you can tailor it specifically to your own tastes. All of the templates can be resized fit your own needs. I encourage you to really make this project your own. And please, send links to your own photos to show me how you made your own Conmemoración.
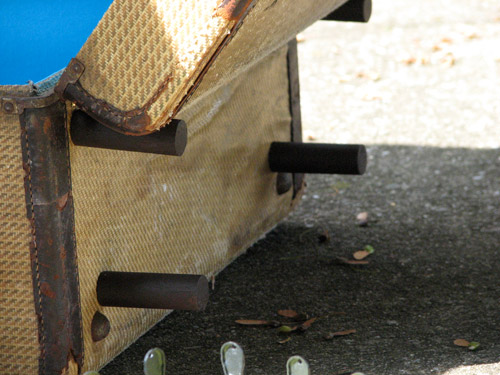
Feet:
Zabet Stewart (photo)
click image to enlarge
The feet will be added to the bottom of your suitcase (even if it already has feet) to add extra height so that when the case is open the lid lays flat on the floor. First you'll need to determine how big the feet should be. It might help to have a friend hold the suitcase off the ground while you measure. For my suitcase, I needed to raise the case 3"/7.5cm off the floor to allow the lid to lay flat. Cut the dowel rod into four pieces of appropriate size with the handsaw. Use the medium grit sandpaper to sand down the cut ends, then go over each piece with the fine grit sandpaper. Wipe clean with a slightly damp towel and allow to dry thoroughly.
When dry, paint the pieces with acrylic craft paint. You may want to apply more than one coat, or even get creative with several colors. I painted mine brown to match the neutral tones of the suitcase. Again, allow to dry thoroughly. The feet will get attached in the next step.
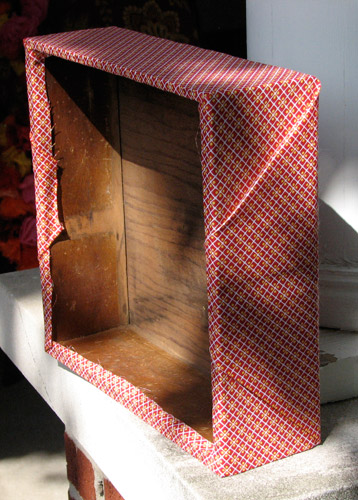
Lining:
You may not have to reline your case unless the lining is in very bad condition or is very musty smelling and you cannot get the smell out. If it will not damage the case, you can always spray a little white vinegar into the case to try to remove the musty smell. Let it dry completely, and follow up by swabbing a little lavender or you favorite essential oil into the cracks to overwhelm any residual smell. If you need to reline the case, it will be the part of the project that takes the longest, but be patient and you will be rewarded with a really great looking liner.
To begin, rip out the old lining and clean out the case as best you can. I would recommend vacuuming all the surfaces and wiping it out really thoroughly to get rid of all the dust and residue that may have been left behind by the old liner.
While the old liner is out, attach the feet. If the suitcase already has feet, explore removing the previous feet and attaching the feet with the screws (and washers if necessary) through any holes left by the previous feet. If the suitcase doesn't have feet or doesn't have removable feet, use the drill to make 4 small holes through the bottom of the case and attach the feet with screws (and washers if necessary) through those holes. Then proceed with lining the case to cover over the screw heads.
Make measurements of all the walls and cut the thin cardboard or bristol board into pieces that will fit together to cover each surface. You may want to under-measure a little when you cut them out because you will have to account for the thickness of your fabric in the final liner piece. If you have a thicker fabric, under measure by about .125"/3 mm all the way around the piece. If you have a thinner fabric, be a little more true to your original measurements. You may want to dry fit your pieces in place with a little tape after you have them all cut out to make sure everything will fit before you start the next steps.
Number the pieces so you will remember where they go in the case. Use these pieces as templates to lay on the iron on adhesive and cut out about 1"/2.5 cm larger all the way around. Also number the cut pieces of iron-on adhesive so you can match them up later in assembly. Iron the adhesive to the wrong side of your fabric and cut out each piece exactly, leaving no extra fabric beyond the edge of the adhesive. Match these fabric pieces back up to their cardboard twins and iron them onto the cardboard, making sure to remove the paper backer from the adhesive first. Then fold over the edge of the fabric and iron the edges down onto the back side of the cardboard, creating a smooth edge and a liner piece that can be easily glued into its spot.
After all the pieces have been ironed together, you can start gluing them into the case. I used epoxy because I wanted an adhesive that had a short working time and would not shift after I got it into place. Mix the epoxy together thoroughly, only squeezing out enough to adhere the piece you are currently working with. Apply the activated epoxy around the edges of the liner piece and dot it into the center of the piece also. Press the piece into place firmly, making sure to press firmly around all the edges and in the center, and hold temporarily until the epoxy sets and will hold the weight of the liner piece on its own.
Continue this process until all the surfaces have been covered and your new lining is complete. Like I said, it takes a while, but that fresh canvas lining your case is totally worth the trouble.
Cloud Inserts:

Zabet Stewart (photo)
click image to enlarge
Trace the templates onto the cardstock and cut out. Glue the printed vellum paper to the cardstock and weight it down under a heavy book, like a phone book, to dry completely. Trim off the excess vellum and apply the thick white glue in a wide border along the bottom edges of each cloud insert. Apply the orange glitter thickly, let dry, and tap off the excess.
Glue each thin cardboard strip along the top edge of back side of each cloud insert. Weight the strip down to insure that it dries flat. Use the bone folder and a ruler to make a crease down the center of the cardstock set aside to make the hinge. Fold the cardstock in half to set the crease. Glue the hinge to the cardboard strip with the crease at the upper edge like an upside down "L". Let dry completely. Apply glue to the other half of the hinge and press it into place in the top of the case. You may have to press firmly to get good adhesion and hold it momentarily until it dries enough to support itself.
Repeat this process for each cloud insert and attach the side inserts before the center insert for best results.
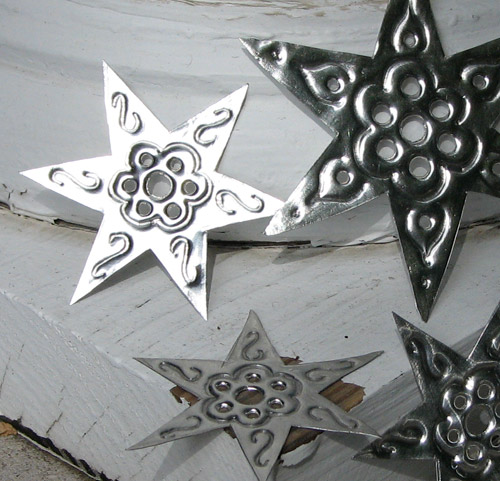
Punched Stars:
Zabet Stewart (photo)
click image to enlarge
Trace the template onto the soft metal sheet and use the hobby knife to cut each star from the sheet. Flip the star over so the back of the star is facing up and burnish the metal with a bone folder from the center to the edge of each ray. Flip the star back over so the front is facing up and use the hammer and craft punch to create the large hole in the center and the six smaller holes around it. Using the pencil, emboss the flower motif around the punched holes and the elongated S-shape on each of the rays. (This sounds fancy, but really all you have to do is draw on the soft metal star with the pencil to emboss it.) Repeat until you have the number of stars you want, and glue them to the lining of the case.
Fabric Covered Boxes:
Zabet Stewart (photo)
click image to enlarge
Cut the fabric slightly larger than the box and wrap it like a present, using the glue to secure all the loose edges. If it is a hollow box, use clothespins to hold the fabric in place around the edge while the glue dries. For a solid box, just hold the fabric in place or weight it down until the glue dries. This will take only a short time. Trim away all the excess bulky fabric on the inside or bottom of the box with the scissors, and you are done.
Skeleton Ribbon:
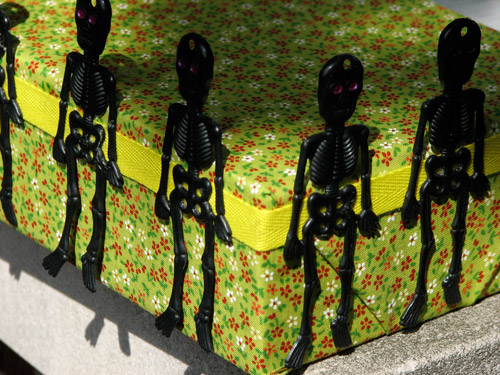
Zabet Stewart (photo)
click image to enlarge
Place a drop of nail polish on each eye of the plastic skeleton to accent it. Let it dry completely. Cut the ribbon so it will wrap around the box and overlap about 1"/2.5 cm. Wrap the ribbon around the box, glue the ends together, and hold until secure. Glue the skeletons to the ribbon and let dry completely.
Deep Mourning Frames:
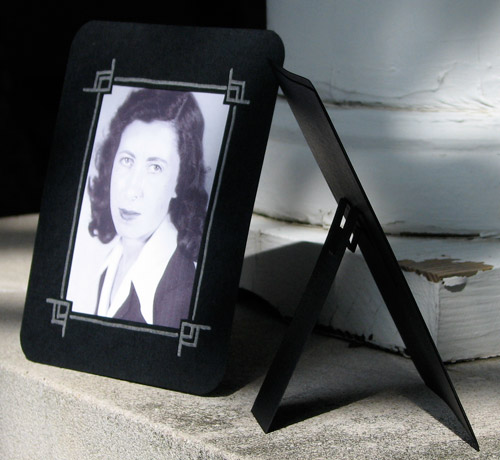
Zabet Stewart (photo)
click image to enlarge
Deep mourning traditionally lasts a full year after loss of a loved one. These frames are for photos of those who have been lost most recently and whose absences are felt the most keenly. This is an American tradition that came from Victorian England.
Trace templates onto a sheet of black cardstock and cut out with a hobby knife. Use the silver marker to accent the photo opening and let dry completely. Position the photo in the opening and apply the glue around the edge on the back side. Cover immediately with the back of the frame, and press down for good adhesion. Trim the frame corners off with the corner rounder. Cut the slits marked on the frame stand and fold into position. Apply glue to the short end of the frame stand and attach to the back of the photo frame. Let dry, and then set up your finished photo frame. Repeat as needed to accommodate all your photos.
As time passes, you can remove the photos in the deep mourning frames and make them into the oval frames described below. The deep mourning frames can then be reused as necessary.
Oval Mourning Frames:
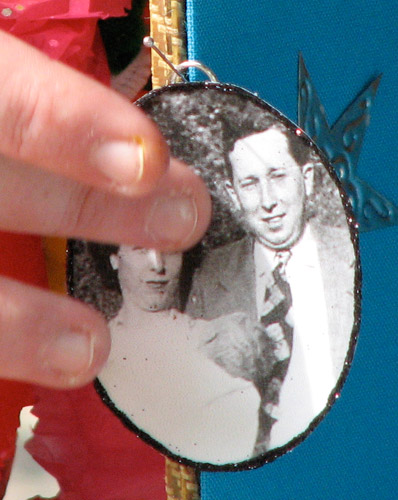
Zabet Stewart (photo)
click image to enlarge
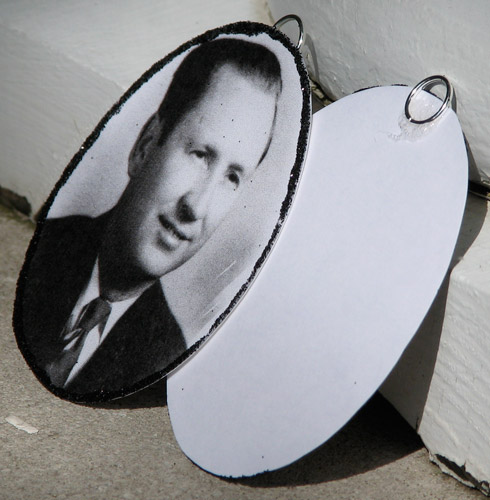
Zabet Stewart (photo)
click image to enlarge
For the remembrance of ancestors that have been gone for longer than a year, use these oval mourning frames that have a thin black border.
Using the template, lightly pencil an oval onto the photo as a cutting guide. Cut out the photos and glue jump rings to the back of the photo at the top with the Fabri-tac glue. Let dry completely. Apply the thick white glue in a thin line around the edge of the photo to create a border. Apply the glitter, tap off excess and let dry before cleaning up any extra glitter on the photo. Pin to inside walls or around the edge of the case.
Paper Flower Garland:
Edith Cummings (photo)
click image to enlarge
Using pinking shears, cut tissue paper into squares that are roughly 3"/7.5cm across.
Edith Cummings (photo)
click image to enlarge
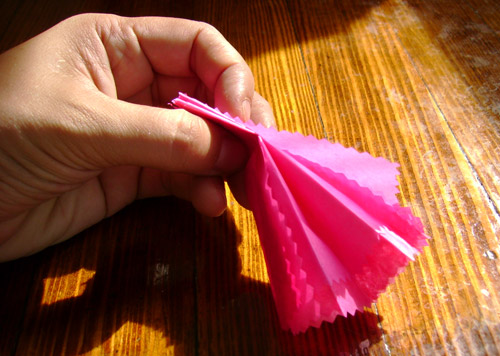
Stack up 4 squares. Beginning at the edge closest to you, fold the stack accordian-style about 8 times (the distance between each fold is slightly less than one centimeter, but it doesn't need to be exact).
Cut a pipe cleaner in half with a wire cutter, or bend it back and forth in the middle until the wire part breaks.
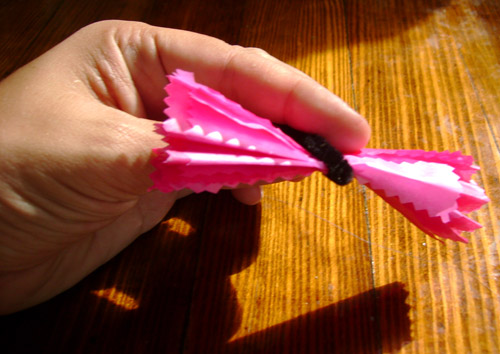
Bend the piece of pipe cleaner in half, and place the paper stack against the bend. Scrunch the paper toward the bend and twist the pipe cleaner closed.
Zabet Stewart (photo)
click image to enlarge
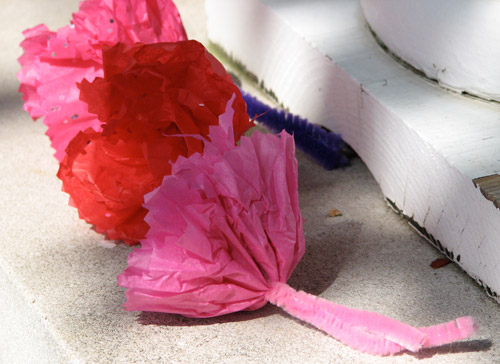
Gently separate each "petal" from the others in your paper stack. Fluff and scrunch the flower with your fingers until you are happy with the way it looks.
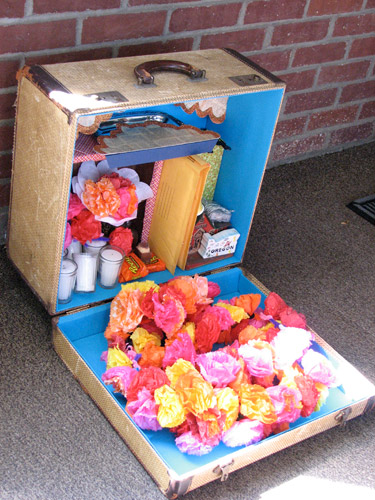
Use the end of one of the flower's pipe cleaner stem to wrap around the stem of the other right behind the head of the paper flower. Keep adding paper flowers in this fashion, filling in where necessary to add fullness, until you have created a chain of flowers in the length that you desire. The chain I created for this project is approximately 4 feet in length.
Assembly:
Zabet Stewart (photo)
click image to enlarge
Zabet Stewart (photo)
click image to enlarge
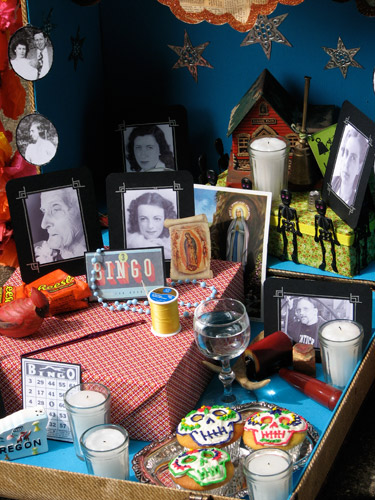
Now that all the mini-projects have been finished, arrange the fabric covered boxes inside the case to visually divide up the altar into different areas. Place any photos in deep mourning frames and completed the box of memories by including objects specific to those being honored. You may also want to offer water to quench their thirst, food to tempt their tastes, and candles to light their way in the dark.
Disassembly:
Zabet Stewart (photo)
click image to enlarge
When your celebration ends, disassemble the altar but leave the clouds and stars in place. Pack the photos and frames into a bubble envelope for protection. Remove any food or drink and leave it for animals to discover (as far from your house as is possible so that they don't come poking around your doors and windows looking for more). Everything should fit inside the suitcase, which can be stored until next year when you can further embellish or update the altar.
About
 contact Raellyn:
• legal info
contact Raellyn:
• legal info
![]()
home • antifesto • this issue • archive • submit • errata • masthead • contact us • legal