

 |
 |
 |
 |
 |
 |
 |
 |
los pequeñeos relojes de arena > mmm... brains.... > calabaza tallada >
conmemoración > calacas de arcilla > huesos deliciosos >
las calacas danzantes > sweet satisfaction > calavera charts >
magdalenas de muertos > he sees you when you're sleeping

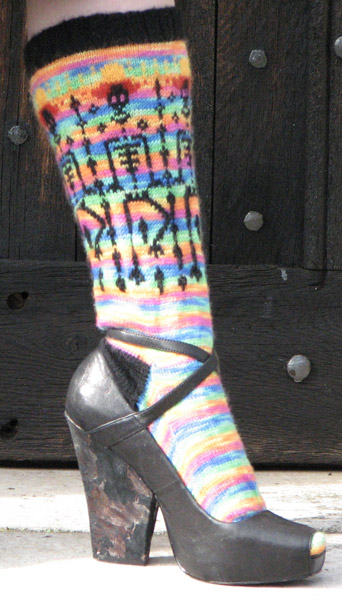
Stevie Savage/Raid Zero (photo)
Jennifer Gwiazdowski (model)
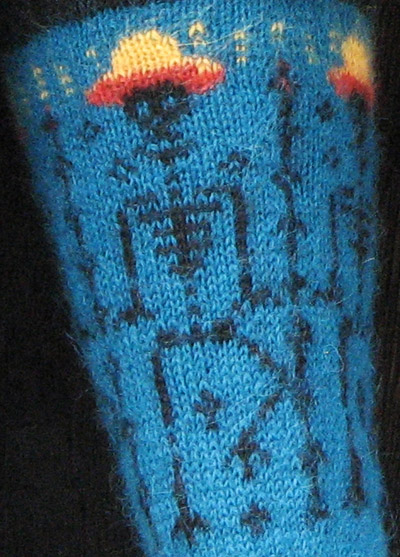
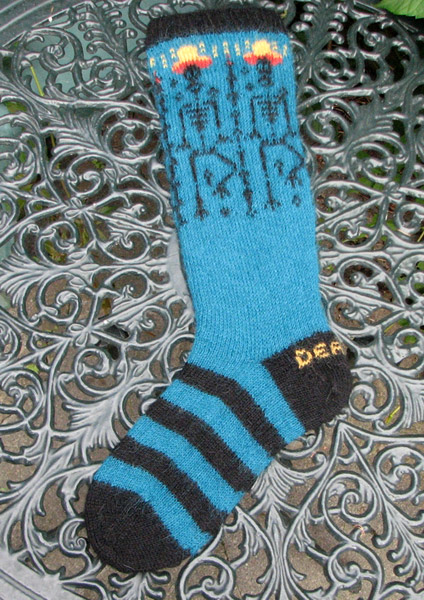
These socks were inspired by the folk art skeleton theme known as a calaca that is associated with Día de los Muertos. This is a day for celebration and Latin Americans on this day make lots of brightly decorated sugar skulls and other festive items to honour the deceased in much the same way as other traditions celebrate Samhain or All Hallows Eve. I was delighted to hear Tim Burton explaining that his simple sketches, especially for the Corpse Bride, were very much inspired by simple but effective themes used as part of Día de los Muertos. I realised that there was a place for my kind of naive doodled sketches in knitting and set about making little line drawings and cartoons with the Muertos theme. One of these sketches led to the motif of the tap dancing skeleton with a Sombrero decorated with cherries, and here you have it adapted into a color stranded chart knitted onto below the knee socks.
Suggested Listening
"El Jarabe Tapatío" Ultimate Mariachi by Mariachi Real De San Diego
Suggested Watching
Corpse Bride (2005, rated PG)
Suggested Reading
Mexican folk dancing in the US: Danzantes Unidos de California
Difficulty
Strong Intermediate
Click here for definitions of difficulty levels.
Finished Measurements
These are measurements of the person, not of the sock. Remember, the sock stretches. Length varies; check Materials notes.
| To Fit Adult Size | Calf Measurement | Ankle Measurement |
| XS | 12.75"/32.4cm | 7.5"/19cm |
| S | 14"/35.5cm | 8.5"/21.6cm |
| M | 15"/38.1cm | 9.25"/24.1cm |
| L | 16.25"/41.3cm | 10.5"/22.6cm |
| XL | 17.25"/43.8cm | 11.5"/29.2cm |
Download
Las Calacas Dazantes Charts (pdf format)
Materials
Stevie Savage/Raid Zero (photo)
Kate Blackburn (knitter)
Jennifer Gwiazdowski (model)
click image to enlarge
- Alpaca teal/black version
- Artesano [100% superfine alpaca; 204yd/184m per 2oz/50g skein] 0785 Bolivia (teal), 2 sk (MC)
- Artesano [100% superfine alpaca; 204yd/184m per 2oz/50g skein] SFN50 Liquorice (black), 2 sk (CC)
- Artesano [100% superfine alpaca; 204yd/184m per 2oz/50g skein] 8744 Ecuador (yellow), 10yd/9m or less (Yarn A)
- Artesano [100% superfine alpaca; 204yd/184m per 2oz/50g skein] 0178 Peru (rust), 10yd/9m or less (Yarn B)
- Artesano [100% superfine alpaca; 204yd/184m per 2oz/50g skein] 1532 Chile (red) Yarn C, 10yd/9m or less (Yarn C)
- Artesano [100% superfine alpaca; 204yd/184m per 2oz/50g skein] 4345 Venezuela (wine), 10yd/9m or less (Yarn D)
- Artesano [100% superfine alpaca; 204yd/184m per 2oz/50g skein] 5340 Brazil (green), 10yd/9m or less (Yarn E)
- Regia Self-Striped Alternative Version
- Regia Ringels [75% wool, 25% polyamide; 230yd/210m per 2oz/50g skein] 05048 Clown, 2 (3, 3, 3, 3, 3) sk (MC)
- Regia Solid [75% wool, 25% polyamide; 230yd/210m per 2oz/50g skein] 2068 Black, 1 sk (CC)
- Oddments (10yd/9m or less) of comprable weight yarn in yellow (Yarn A), rust (Yarn B), red (Yarn C), wine (Yarn D), and green (Yarn E)
- US 3/3.25 mm knitting needles (Needles A) for casting on and ribbing, your choice of:
- either dpns, set of 5
- or one long circular (40"/100cm" or longer)
- or two short circulars (24"/60cm or 32"/80cm)
- †US 1/2.25mm - US 2/2.75mm knitting needles (Needles B) for cuff, your choice of:
- either dpns, set of 5
- or one long circular (40"/100cm" or longer)
- or two short circulars (24"/60cm or 32"/80cm)
- †US 0/2mm - US 1/2.5mm knitting needles (Needles C) for foot, your choice of:
- either dpns, set of 5
- or one long circular (40"/100cm" or longer)
- or two short circulars (24"/60cm or 32"/80cm)
- Tapestry needle for weaving in ends and duplicate stitching
- Tapestry needle for duplicate stitching (optional)
- Yarn bobbins (optional)
- Stitch markers for marking out rpts or beg of rnd (optional)
Gauge
28 stitches and 36 rows per 4"/10cm inches stocking stitch (on calf section and color stranded section)
32 stitches and 40 rows per 4"/10cm stocking stitch on foot section
Design Notes
This pattern uses the terms Yarn Forward (yfwd) and Stocking Stitch, which are the British equivalents of Yarn Over (yo) and Stockinette Stitch in US terminology.
Stranded Color work
I have been knitting colored motifs many years now, and so have become relaxed enough in my stranding to not affect my gauge too much, but even I get caught out occasionally if I rush forward too quickly and don't carefully stretch all my stitches out. This is not a knit to be done quickly like lots of rows of plain stockinette. Take your time much as you would if you were following a cross stitch chart, and place each stitch carefully. Be warned: if you don't knit this loosely as instructed, you could find these socks difficult to pull over calves; so if you find your knitting is tighter with color stranding than without, then compensate by going up a needle size or two. Even if your gauge measures up correctly on the RS of your work, you may find the sock does not have enough give to stretch at all.
The method of stranding used here is to carry the yarn very loosely across the back of the work to the next place it is to be used without any twisting or knitting in of yarns at the back. This is to avoid any stranding showing through when the sock is worn and stitches inevitably stretch sideways. I have placed as many float stitches as I can (the dots in the background) and custom tweaked the chart in every size to help you, but you will still have larger areas to work over than you might expect. Whilst working, avoid tangling the ends where you joined new yarns by threading the ends down through the cuff of the sock and tying together in a loose knot. Each time you join a new yarn, you can tie it on to this bundle.
Using circulars rather than dpns helps too, so when you strand over large areas spread your stitches out as far as you can stretch them and then knit. When your knitting springs back to become bunched up again on the needles, you will be terrified at the loops hanging there and convinced you are going to garrotte your toes, but I can assure you that if you choose a yarn with a high fleece content, the strands will eventually cling to the WS of your socks and with wear, they even start to turn to felt. If it worries you greatly, when you weave in your ends you can sew down any loose strands.
Gauge
I cant emphasise enough how getting the correct gauge with the right sized needles is paramount to the success of your knit and so I have written down the range of needles used by me and my knitter rather than a specific one. As I have said above, my gauge is fairly standard between the stranded and plain sections, but in order to get a good fit around the ankle without drastic decreasing that spoils the gentle calf shaping, going down a needle size is a good idea. Do this if you have an average sized foot but you will need to change to the second gauge stated. If you are a tight knitter and have a wider foot, then perhaps it would not be so necessary. I found as well with the alpaca, as it is not a manufactured sock yarn and so does not have a nylon content it worried me that the fabric was going to be too light and insubstantial around the heel and foot and not hard wearing enough, so knitting more tightly around the ankle and foot helped.
Strengthening the heel
I would strongly recommend doubling up your yarn over the heel and toe section if you use 100% wool or alpaca, and if you are worried about wearing these areas out, then perhaps even substitute another sock yarn for this section. Another way of strengthening the heel is to add some sock knitters' nylon thread. I knitted with two strands on the alpaca version.
Getting a perfect fit
I have divided the range into 5 sizes but you may want to measure your calf, leg and ankle circumference and perhaps may want to mix and match sizes for a better fit. After all, not everyone with a skinny calf has a skinny ankle or foot and vice versa and part of the joy of knitting your own socks is being able to customise it to fit your own body. Use the chart to help you get the right number of stitches for the calf and ankle width you want.
Example of sizing customization:
- My calf = 15.75"/40cm
- Nearest size = size L
- My ankle = 9"/23cm but size L = 10.5"/26.7cm, which is too large
- The nearest to my ankle size is size M
- Size L leg has a cast on number of 96 sts
- Size M ankle has a stitch number of 76 sts
- Therefore I need to decrease 20 sts between leg and ankle
- Decrease rows have 2 sts each, so I need to decrease 10 times
- If I decrease at the same rate as the pattern says, every 6th row, I will be knitting at least 60 rnds instead of 36, so that will make my leg longer by 24 rnds.
- With this gauge, is 24 ÷ 9" = 2.66"(6.8cm) longer
- If I don't have another 2"/5cm plus space on my leg to wear it (these socks are calf high/below the knee) then I would try decreasing every 4th or 5th row instead of 6th. For instance, every 4th row 10 times = 40 rows which is only 4 rnds longer than the pattern called for, an extra 4 ÷ 9 = 0.44 just under half an inch or just over a centimetre.
If you are knitting for someone else use their shoe size and an online resource for converting this to foot length.
Cuff:
With Needles A and using CC, CO 72 (80, 88, 96, 104) sts.
Join into rnd without twisting and Knit 12 rnds of K2 P2 rib.
Change to Needles B and MC and knit 2 rnds in stocking stitch.
Wind some of each of yarns CC, A and B onto yarn bobbins in preparation for color work.
Calacas without cherries.
Stevie Savage/Raid Zero (photo)
Jennifer Gwiazdowski (model)
click image to enlarge
Start knitting from first rnd on chart. Be sure to work from the chart that matches the size you are knitting!
Using the relevant skeleton motif chart for size, knit from the chart starting from top LH corner (or turn charts upside down, as you will be knitting from top to bottom) and knit all rnds following from left to right (right to left if upside down) on every rnd until all have been completed.
Next 5 rnds: K 5 rnds in MC only.
Rnd 6: K2tog, k to last 3 sts in rnd, ssk, k1. (This places a pair of decreases around one central stitch. This stitch should now be centre back of calf all the way down to the heel.)
Repeat Rnds 1-6 five more times.
K a further 3 rnds in stocking stitch.
Change to Needles C and knit another 2 rnds in stocking stitch.
Heel:
Next rnd: K 45(51, 57, 63, 69) sts and slip rem 15 (17, 19, 21, 23) sts onto one needle, then slip the first 15 (17, 19, 21, 23) sts of the beginning of next rnd on to the same needle. There should now be 30 (34, 38, 42, 46) sts on this needle, and these will be your heel sts. The remaining 30 (34, 38, 42, 46) sts can be put to one side for picking up later as the front of foot.
Just double check that your heel corresponds with your calf shaping, so that the previous sets of decreases and the centre stitch now run down to approx the centre of the heel. (The centre will be just one stitch off, as the heel is knitted on even number of sts, but this won't show.)
On the heel sts only, join two strands of CC yarn and continuing with your smaller needles you used for the ankle, knit a short row heel as follows.

Stevie Savage/Raid Zero (photo)
Jennifer Gwiazdowski (model)
click image to enlarge
Next you'll work the LIFE or DEATH colorwork for the heel using the charts. The stitches you need to knit for the lettering are marked out by red borders/boxes and the instructions below tell you where to place the boxes to ensure the lettering is centred onto the heel of the sock. Start from the top LH corner of the red boxes marked on the charts and work downwards back and forth in rows. If it makes it easier to follow, turn charts upside down and work from the RH bottom corner of the box upwards back and forth in rows. The XS size has special instructions for both charts; all other sizes use the same instructions for their respective charts.
To knit a short row heel placing DEATH—XS size only
Row 1: K to last st unwrapped, w&t.
Row 2: P to last st unwrapped, w&t but at the same time, using Yarn A (or other contrasting yarn of your choice) for the letters and CC yarn as background, start knitting from DEATH chart on 5th stitch from the edge (wrapped stitches are counted too).
Row 3 onwards: Continue knitting short row heel by repeating rows 1 and 2 whilst at the same time following the chart for DEATH as placed.
To knit a short row heel placing DEATH—All Other Sizes (S, M, L and XL)
Row 1: K to last st unwrapped, w&t.
Row 2: P to last st unwrapped, w&t.
Rows 3 and 4: Rpt Rows 1 and 2.
Row 5 onwards: Continue knitting short row heel by repeating rows 1 and 2 whilst at the same time following the chart for DEATH placing the first stitch for the letter D on the 0th (7th, 9th, 11th, 13th) stitch from the edge (wrapped stitches are counted too).
To knit a short row heel placing LIFE—XS size only
Row 1: K to last st unwrapped, w&t.
Row 2: P to last st unwrapped, w&tbut at the same time, using Yarn A (or other contrasting yarn of your choice) for the letters and CC yarn as background, start knitting from LIFE chart placing the first stitch from the letter L on the 8th stitch from the edge (wrapped stitches are counted too).
Row 3 onwards: Continue knitting short row heel by repeating rows 1 and 2 whilst at the same time following the chart for LIFE as placed.
To knit a short row heel placing LIFE—All Other Sizes (S, M, L and XL)
Row 1: K to last st unwrapped, w&t.
Row 2: P to last st unwrapped, w&t.
Row 3 and 4: Rpt Rows 1 and 2.
Row 5 onwards: Continue knitting short row heel by repeating rows 1 and 2 whilst at the same time following the chart for LIFE placing the first stitch for the letter L on the 0 (10th, 12th, 14th, 16th) st from the edge stitch from the edge (wrapped stitches are counted too).
Continue knitting short rows as set out above, and following the lettering on the charts. You will complete the lettering part by the 6th row of the chart.
Once done with the chart, continue knitting the heel with short rows and CC yarn only until a total of 10 (12, 13, 14, 14) sts wrapped each side of heel and 10 (10, 12, 14, 16) sts are left unwrapped in the centre.
Now start to pick up wraps as follows:
Row 1: K to next wrapped stitch, PU wrap, w&t.
Row 2: P to next wrapped stitch, PU wrap, w&t.
Continue until all wrapped stitches have been picked up.
Foot:
Change to one strand of MC yarn.
Join back in a rnd with front of foot sts left on the other needle previously. [60 (68, 76, 84 92) sts]
K 8 rnds, stopping at centre bottom foot (this will hide any slight jog you get in the stripes)
To avoid an obvious jog in the next step, when changing colors knit one round with the new color then at the beg of 2nd rnd, put RH tip of needle into first st of rnd below, pick up and place on needle with 1st st of next rnd and K2tog, then continue knitting rnds as normal. It isn't perfect but it fools the eyes of non knitters not looking for it. Anyway, it is best to leave the 'joins' on the bottom of the foot where it won't be seen.
Change to one strand of CC yarn and K8 rnds.
Continue and K 8 rnds MC followed by 8 rnds CC until foot is approximately desired length minus 2 inches ending on the 8th rnd of a MC stripe
Toe:
Rejoin two strands of CC and K 2 rnds
Arrange so that stitches are divided equally (by half) between top and bottom on your needles (or place markers if necessary to divide top and bottom of toe) and begin to decrease for the toe
Next rnd: [K1 SSK, K to last 3 sts before end of needle (or before marker), K 2 tog, K1] twice.
Next rnd: Knit to end of rnd
Continue knitting a toe in CC yarn in this way, i.e. a decrease rnd followed by a normal rnd until a total of 20 (24, 28, 32, 36) sts remain.
Place 10 (12, 14, 16, 18) on one needle for top of foot, and the remaining 10 (12, 14, 16, 18) on another needle for bottom of foot.
Close the toe using Kitchener stitch. (Kitchner stitch instructions here; videos here.)
Finishing:
Weave in all ends including undoing the ends of yarns knotted and left inside of color stranding of sock. Duplicate stitch anything you left off from the knitting, e.g. the cherries and use a back stitch to embroider cherry stems in green from the fruit to the hat.
Blocking:
Stevie Savage/Raid Zero (photo)
Jennifer Gwiazdowski (model)
click image to enlarge
Knee socks just do not look good on the needles. They look a bit saggy and shapeless while you are working on them and unlike ankle socks, you don't get the same satisfaction of seeing a perfectly formed sock. Also, you will probably have been trying these on, even if you are knitting them for someone else and that stretches it and it does get creased as you are making it too. Don't panic, this is normal, and I can assure you that when the sock is laundered and blocked especially on some sock blockers something magical happens and it turns into a leg shaped sock. Launder your first sock, if you need a bit of spurring on with the second and when you see the results it will keep you going. What blocking will not do, though, is loosen your strands enormously, so don't expect miracles if you knitted too tightly.
Launder in some gentle baby shampoo and put on a sock blocker and dry flat. You may go and visit it every 20 minutes or so and lovingly smooth the knit out if you wish; it's hard to part with socks like these when you've been so close for so long! Fair Isle or stranded knitting really does need the benefit of the weight of some water on it to smooth out the stitches. Too many people rush to put their knits on or take photos without taking the time to launder and block to a satisfyingly pristine condition.
About
 contact Erssie:
• http://www.erssieknits.com • legal info
contact Erssie:
• http://www.erssieknits.com • legal info
![]()
home • antifesto • this issue • archive • submit • errata • masthead • contact us • legal