

 |
 |
 |
 |
 |
 |
 |
 |
los pequeñeos relojes de arena > mmm... brains.... > calabaza tallada >
conmemoración > calacas de arcilla > huesos deliciosos >
las calacas danzantes > sweet satisfaction > calavera charts >
magdalenas de muertos > he sees you when you're sleeping
Carin Huber (photo)
click to enlarge
Oh, Spirit, wrapp'd in tawdry cloak,
Thy cheeks, emboldened with too much blush,
Frame a plastic smile.
Some call you "cheap,"
But I see darkness in your cheery eyes.
Come, put off this tinsel garland
And draw on more somber garb.
Dust with ashes the flowers within your bony grasp,
Little Dollar Store Death.
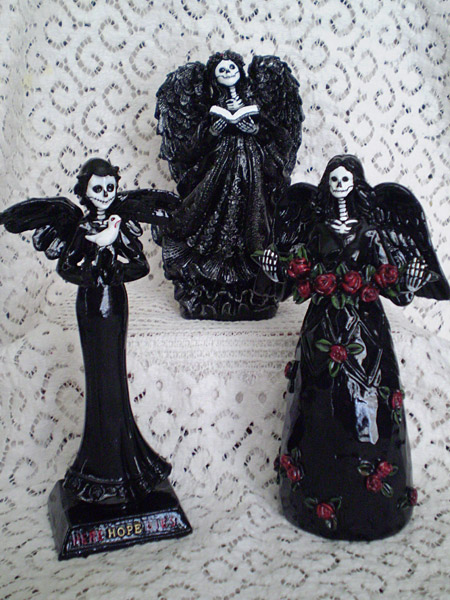
Inspired by my best friend Viv's garden statue death angel, I have made a performance piece of it, transforming cheap dollar store angels into morbid art suitable for your Samhain altar. I prefer the angels available at Christmas time, as their wings tend to be more impressive, but any angel can show her darker side.
Suggested Watching/Reading/Listening
Beetlejuice (1988, rated PG)
Difficulty
Bob Ross Wannabe
Click here for definitions of difficulty levels.
Materials
- Angel figurine from your local dollar store
- Glass etching cream (optional - see Design Notes)
- Black spray paint
- White acrylic craft paint
- Black acryllic craft paint
- Acrylic craft paints in other colors (optional - see Design Notes)
- Spray sealant/clear spray paint
- #18/0 (or smaller) round paintbrush
- #1 flat paintbrush (aka "bright" or "shader")
- A cup or jar of water, in which to rinse brushes between colors
- Paper towels, for blotting brushes
Design Notes
Sometimes the best dollar store angel is made of ceramic with a glossy glaze. Paint doesn't stick well to this finish, which is essentially a thin layer of glass. In this case, get a bottle of glass etching cream. Generously slather the entire angel with the cream (wear rubber gloves - it's caustic!). Wait the amount of time directed on the bottle, scrape the excess cream back into the bottle, and thoroughly rinse the remaining cream off of the angel. Let the angel dry. Paint will now stick to the etched surface.
Many dollar store angels are holding, or dressed in, flowers, usually roses. Sometimes they have other accessories. You may wish to paint these some color other than black or white. Get craft acrylic paint in your chosen colors. Being old fashioned in my gothiness, I like some kind of green for leaves, and a dark red for flowers. Note: Red acrylic paints are notoriously transparent, and you are painting over a black background. Either be prepared to apply way too many coats of red, or choose a red several shades brighter than you want the roses to look.
Let both the spray paint and the craft paints dry between each step, or between each layer. Trying to add more paint on top of wet paint will only lift off the previous layer, or make the paint run. Rinse your brushes well between colors and while waiting for layers of paint to dry, and blot excess water off of the brush on a paper towel. Watch, too, that drops of water do not threaten to run down the handle of your brush as you're painting the details, or you will have a wash of watery paint to clean up from your angel.
Preparing the Angel:
Take a close look at your dollar store angel. She may have (shudder) glitter glued to her. If so, give her a brisk scrub with a stiff brush. Don't worry about getting all of the glitter off; you just need to make sure there isn't any loose glitter to clog up your brushes, or to come off with handling, leaving unpainted spots on your finished death angel.
Spray paint the angel black. While she dries, admire how evenly you have painted her, how you didn't miss a spot. Once dry, pick her up and turn her over. See all the spots you missed on the bottoms of the details. Give her a few spritzes from below with the spray paint, painting your wrist and hand in the process. Allow her to dry again.
Painting the Bones:

Carin Huber (photo)
click image to enlarge
Using white acrylic paint and the #18/0 round brush, paint the angel's face white. It may take more than one layer of white to get an even complexion.
Using black acrylic paint and the #18/0 round brush, paint in her eye sockets and nose hole. Paint a fairly wide line across her mouth, covering her lips, and curving it up and under her cheekbones at each end. Touch up any spots of white that have strayed where they shouldn't.
Using white acrylic paint and the #18/0 round brush, paint tiny lines into the black line across the lips, to form teeth. Touch up any areas of black that are too big for their britches. This method is easier than trying to paint super thin lines of black. You might decide your death angel is missing a tooth or two; just don't paint a tooth in there.
Still using the white paint, paint a few vertebrae down her neck. Look for any areas of skin not covered by her clothing or flowers. Does she have a hand or bare foot visible? Paint in her finger or toe bones. Is the neckline of her dress low? Give her collar bones. A quick search online for skeletal structure should yield a helpful guide or two.
If you are happy with your Dollar Store Death at this point, proceed to Finishing. If, however, you want to add some color to the flowers and accessories she bears, continue on.
Painting the Flowers and Accessories:
With the #1 flat paintbrush, dry brush the colors of acrylic paint you've chosen onto the leaves and petals of the flowers, thus: pick up some paint on the brush, then wipe most of it off on a paper towel, working the paint through the bristles as you do so. Just touch the brush across the high points of the flowers or leaves. The idea is to leave the deeper parts of the detail (the veins on the leaves, between the flower petals) black, while adding color to the outer edges. If you don't see anything happening, go ahead and add more paint to the brush. It's always easier to put more paint on the angel than to remove too much. If you see color, but it's too transparent, let that layer of paint dry, then add another layer. Have patience; you may have to add a few layers to get the look you want. It's hard to cover a black base coat.
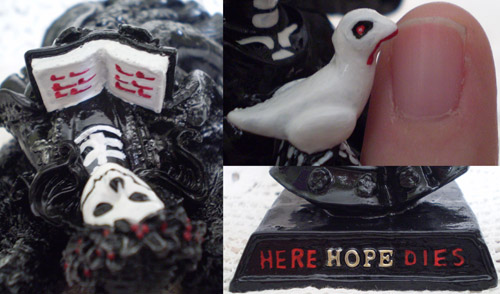
Carin Huber (photo)
click image to enlarge
Paint any accessories as you see fit. The angel pictured with the book has lines of dark red painted on the pages, to represent names written in blood. The design on her robes and the edges of her feathers are lightly brushed with silver, for an eerie shimmer. The eyes of the creepy dove in the thin angel's hands were painted in a similar manner as the angels' teeth: a broad circle of red was painted around a tiny white pupil, then a broad circle of black narrowed the red circle down to a tiny iris. Finally, a layer of white covered the excess black, until it just rimmed the eyes. The blood dripping from the beak was done the same way, with a broad red swath being shaped by a white over coat. You can paint incredibly tiny details this way. For scale, that's my pinkie finger in the closeup. The word "HOPE" appears in raised letters at the angel's feet. The creative application of two more words made it fit the theme.
Finishing:
Check your angel over and make any necessary touch ups. Once you are satisfied with your angel, apply the spray sealant. Two or three light coats are much better than one thick coat, which would likely run. Remember the lesson you learned when you spray painted her black, and give her a few spritzes from below, sealing your wrist and hand in the process, because you still haven't learned that part of the lesson. Allow your angel to dry thoroughly before handling her. Even once the finish is dry enough to handle, it will still be some time before it is completely cured, so set her somewhere she won't be disturbed for a few days more.
About
 contact Carin:
• legal info
contact Carin:
• legal info
![]()
home • antifesto • this issue • archive • submit • errata • masthead • contact us • legal