

 |
 |
 |
 |
 |
 |
 |
 |
wa na na na na na na na bat shawl! > alia > parlor round >
fuck off, i'm trying to read > run away! > algormortis >
baba yaga > bonjour, nazar boncugu > impaler
Vanessa Carter (photo)
click to enlarge
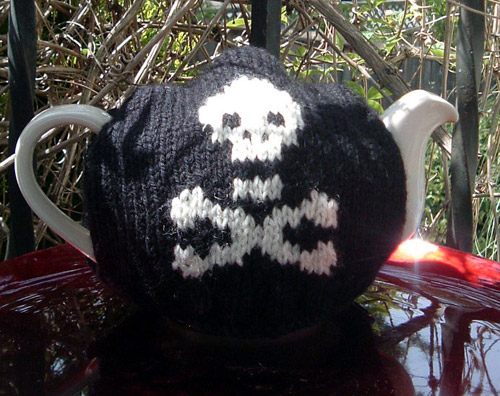
Algormortis may be inevitable after death, but your tea need not cool so quickly. This sinister cozy will keep your brew warm long after the body goes cold.
Suggested Listening
Danse Macabre by Wintersleep
Difficulty
MoonPrincess RavenDark
Click here for definitions of difficulty levels.
Finished Measurements
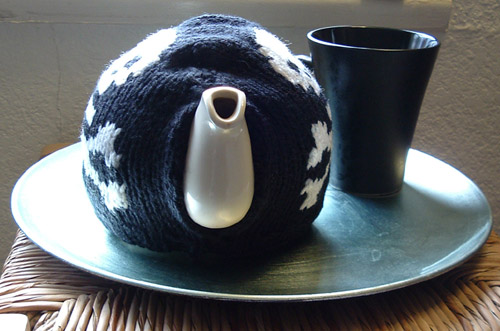
Fits a 4-6 cup size Brown Betty-style teapot. Laid flat, bottom is 8"/20cm W and 7"/17.5cm H from bottom ribbed edge to top fold.
Download
Algormortis Chart (pdf format)
Materials
- Patons Classic Wool (100% wool; 223yd/205m per 3.5oz/100g skein); Black; 1 skein (MC)
- Patons Classic Wool (100% wool; 223yd/205m per 3.5oz/100g skein); Aran; 1 skein (CC)
- US 8/5mm straight needles
- Stitch markers as needed to follow chart
Gauge
18 sts and 26 rows per 4"/10cm in stockinette stitch (after blocking).
Design Notes
This cozy is knit flat in one piece; sort of up one side, over, and down the other. It is then strategically seamed to create a teapot shape. All parts of the cozy aside from the skull pattern (which is worked in CC) are worked in the MC.

Vanessa Carter (photo)
click image to enlarge
CO 38 sts using MC.
Row 1: *k2, p2* across.
Row 2: *p2, k2* across.
Rows 3-4: Repeat rows 1 and 2.
Row 5: Repeat Row 1.
Row 6: (RS) Knit across.
Row 7: (WS) Purl across.
Now you'll need the chart to continue. Note: Be careful not to pull the carried yarn too tightly across the back of your intarsia sections, as this will make your skull pucker.
Row 8: (RS) K10, place marker, work row A of chart, pm, k11.
Row 9: (WS) P11, work row B of chart, p10.
Row 10: K10, work row C of chart, k11.
Row 11: P11, work row D of chart, p10.
Row 12: K10, work row E of chart, k11.
Row 13: P11, work row F of chart, p10.
Row 14: K10, work row G of chart, k11.
Row 15: P11, work row H of chart, p10.
Row 16: K10, work row I of chart, k11.
Row 17: P11, work row J of chart, p10.
Row 18: K10, work row K of chart, k11.
Row 19: P11, work row L of chart, p10.
Row 20: K10, work row M of chart, k11.
Row 21: P11, work row N of chart, p10.
Row 22: K10, work row O of chart, k11.
Row 23: P11, work row P of chart, p10.
Next begin decreases for shaping the top of the cosy:
Row 24: K1, ssk, k to first marker, work row Q of chart to second marker, k to last 3 sts, k2tog, k1. (36 sts)
Row 25: P to first marker, work row R to second marker, p to end.
Row 26: K1, ssk, k to first marker, work row S of chart to second marker, k to last 3 sts, k2tog, k1. (34 sts)
Row 27: P to first marker, work row T to second marker, p to end.
Row 28: K1, ssk, k to first marker, work row U of chart to second marker, k to last 3 sts, k2tog, k1. (32 sts)
Row 29: P to first marker, work row V to second marker, p to end.
Row 30: K1, ssk, k to first marker, work row W of chart to second marker, k to last 3 sts, k2tog, k1. (30 sts)
Row 31: P to first marker, work row X to second marker, p to end.
Row 32: K1, ssk, k to first marker, work row Y of chart to second marker, k to last 3 sts, k2tog, k1. (28 sts)
The chart has ended, so continue on with MC for the top:
Row 33: (WS) purl across.
Row 34: (RS) knit across.
Rows 35-40: Repeat Rows 33 and 34.
Row 41: Repeat Row 33.
Begin increasing back out to 38 sts (the number you cast on). You'll need the chart again starting at Row 43.
Row 42: (RS) K1, m1, k across to last stitch, m1, k1. (30 sts)
Row 43: (WS) P to first marker, work row Y to second marker, p to end.
Row 44: K1, m1, k to first marker, work row X to second marker, k to last stitch, m1, k1. (32 sts)
Row 45: P to first marker, work row W to second marker, p to end.
Row 46: K1, m1, k to first marker, work row V to second marker, k to last stitch, m1, k1. (34 sts)
Row 47: P to first marker, work row U to second marker, p to end.
Row 48: K1, m1, k to first marker, work row T to second marker, k to last stitch, m1, k1. (36 sts)
Row 49: P to first marker, work row S to second marker, p to end.
Row 50: K1, m1, k to first marker, work row R to second marker, k to last stitch, m1, k1. (38 sts)
The increases are over, but you'll still need the chart:
Vanessa Carter (photo)
click image to enlarge
Row 51: (WS) P 11, work row Q of chart, p10.
Row 52: (RS) K10, work row P of chart, k11.
Row 53: P11, work row O of chart, p10.
Row 54: K10, work row N of chart, k11.
Row 55: P11, work row M of chart, p10.
Row 56: K10, work row L of chart, k11.
Row 57: P11, work row K of chart, p10.
Row 58: K10, work row J of chart, k11.
Row 58: P11, work row I of chart, p10.
Row 60: K10, work row H of chart, k11.
Row 61: P11, work row G of chart, p10.
Row 62: K10, work row F of chart, k11.
Row 63: P11, work row E of chart, p10.
Row 64: K10, work row D of chart, k11.
Row 65: P11, work row C of chart, p10.
Row 66: K10, work row B of chart, k11.
Row 67: P11, work row A of chart, p10.
The chart is over, so continue in MC:
Row 68: K across.
Row 69: P across.
Row 70: *P2, k2* across.
Row 71: *k2, p2* across.
Rows 72 and 73: Repeat rows 70 and 71.
Row 74: Repeat Row 70.
BO loosely in pattern.
Alternate Ending: Button-Up Cosy
Skip to Finishing if you do not want a button band on your cosy.
Having finished binding off, pu 5 sts along one of the ribbed sections.
Rows 1-4: K across.
Row 5: K2, ssk, k1.
Row 6: K2, YO, k2.
Rows 7 and 8: K across.
BO all sts.
Attach a button to other side of ribbing band, and voila, a button band for easy removal of the cozy from your teapot. Follow the finishing directions below except where you have placed the button band and the button.
Finishing

Where to seam your teacosy.
click image to enlarge
Fold piece in half from top to bottom with WS showing. Align bottom ribbed edges together. Sew a seam on each side of ribbing band that only attaches the ribbing bands together. At top of cozy, sew a short seam (about .75"/2cm) to bring the increases and decreases together on each side.. Weave in end, block over your teapot, and round out the top edges of the cozy to avoid little "ears" on each side (unless you like that sort of thing).
About
contact Vanessa at her LJ:
http://knitfish.livejournal.com • legal info
![]()
home • antifesto • this issue • archive • submit • errata • masthead • contact us • legal