

 |
 |
 |
 |
 |
 |
 |
 |
vertigo > barely concealed rage: a breakfast tray >
skull lariat > odob > surprise: aw, crap
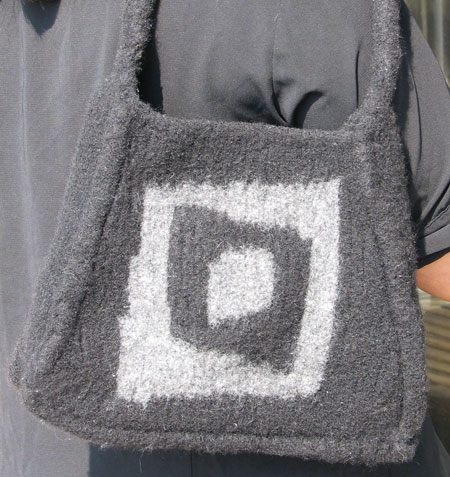
Smitha Nair (model)
Zabet Stewart (photo)
click image to enlarge
The concept for this purse had been kicking around my head for a while now - about three years, in fact. But my felting skilz were lacking, and I learned something new each time I tried to make it.
Version 1.0 had no structure, and as I had knit it with Lamb's Pride without knowing that mohair didn't felt like wool it looked like I had skinned Cookie Monster's goth brother. Also, I didn't realize that in the felting process knitting tends to shrink much more vertically than horizontally - vertically and horizontally here refering to the columns of stitches. (If you knit something side-to-side and felted it, it would shrink more horizontally than vertically. But I digress.)
Version 2.0 was a great sucess, though still not quite what I wanted. I switched over to Cascade 220 to solve the furry issue, and played with some methods for adding a firmer structure around the bag. It was still too wide however, so I went back to the drawing board, tweaking the cocentric squares to fit on a much narrower chart.
Version 3.0, which I present to you here, finally reflects what has been in my head all this time. (Naughty Indian Girl model not included.)
Suggested Viewing
Vertigo (1958)
Difficulty
Strong Intermediate
Click here for definitions of difficulty levels.
Finished Measurements
After felting: 8.5" tall (not including strap), 10" wide at bottom, 7" wide at top, 2" gusset. Your milage may vary.
Download
Vertigo colorwork chart (pdf format)
Materials
- Cascade 200 [100% wool; 100g per 220yd skein]; 1 skein 9473 Medium Grey (CC); 2 skeins 9465 Black (MC)]
- US 13/9mm needles
- Size K/6.5mm crochet hook
- Yarn needle
Gauge
16 sts x 23 Rows = 4"/10cm in stockinette stitch, unfelted (Note that getting gauge is not a priority on a felted purse, as you can always stop felting when you reach the desired size. If you are getting 3.5-4 sts/inch, you're probably fine.)
Project Notes
Two strands of yarn are held together as one throughout the entire project.
Directions
Back
In MC (black) co 22 sts.
Knit the following (stockinette):
Row 1: k (RS)
Row 2: p (WS)
Repeat Rows 1 and 2 twice more.
Row 7: k1, m1, knit to last stitch, m1, k1
Rows 8, 10, 12: purl all sts
Rows 9, 11: knit all sts
Repeats Rows 7-11 six more times. (You will have 36 sts on the needle when you're done.)
Bottom Gusset
Next, knit the following (reverse stockinette):
Row 1: purl all sts (RS)
Row 2: knit all sts (WS)
Row 3: Run a spare needle through the last purl ridge on the WS. Purl this row together with the stitches you just picked up, as for a three needle bind off without slipping the stitches over each other.
Rows 4, 6, 8, 10, 12: purl all sts
Rows 5, 7, 9, 11, 13: knit all sts
Row 14: knit all sts (WS)
Row 15: purl all sts (RS)
Row 16: Run a spare needle through the last purl ridge on the WS. Knit this row together with the stitches you just picked up, as for a three needle bind off without slipping the stitches over each other.
Front
Starting on the RS with a knit row as Row 1, knit the front in stockinette following the color chart. You will need intarsia skillz, and you will save a lot of time if you wind one sk of the MC and one sk of the CC into several smaller balls. (Download Vertigo chart if you have not already done so.)
On Rows 7, 13, 19, 25, 31, 37, and 43 knit a decrease row.
Decrease Row: K1, k2tog, knit to last three sts, k2tog, K1.
When finished with the chart, bind off knitwise.
Right side gusset
PU 10 stitches along the side of the bottom gusset on the right-hand side. This is Row 1.
Row 2 and following rows: continue in stockinette stitch for 43 more Rows (44 rows total, including picked up Row 1), ending on the WS just after finishing a purl row. Do not bind off; place sts on a piece of waste yarn or stitch holder.
Left Side gusset and Strap
Work left side gusset as for right side, but stop after Row 44. Do not bind off or remove sts from needle. Instead, turn and knit one row. Turn again and purl the next row. On the next row, begin decreasing for the strap.
Decrease for Strap Row 1: k1, ssk, k to 3 sts left, k2tog, k1 (8 sts on needle)
Row 2: Purl all sts.
Decrease for Strap Row 3: k1, ssk, k to 3 sts left, k2tog, k1 (6 sts on needle)
Row 4: Purl all sts.
Begin working 6-stitch i-cord for 18" or until strap is desired length. Leave all sts on needle and begin next section.
Joining the strap
Place sts from right-hand gusset onto another needle. Graft/Kitchner this end to end from strap. Leave a long tail and weave in ends very securely.
Seaming
For stability and durability, use a crochet slip stitch to seam up on the RS. (i.e., Do not turn the purse inside out to seam it.) Try to work with the purl ridges on either side of the bottom gusset so that the purl ridge and the slip stitch form a singe, continuous ridge all along the edges of the purse.
Finishing:
Weave in ends. Full until desired size is reached. I myself felted the thing within an inch of its life, running it through two entire hot wash-and-rinse cycles with jeans and towels.
Snip any yarn ends that have been felted into worms. Add a magnetic snap or other closure if you like. (I have plans to do this by applying the magnetic snap to a piece of black felt and then sewing the black felt into the purse.) Take your new bag out on the town and make others dizzy from its fabulousness.
About
![]()
home • antifesto • this issue • archive • submit • errata • masthead • contact us • legal