

 |
 |
Beltane 2006 |
 |
 |
 |
on asparagus > henry viii > green woman > i am doll parts >
 Henry VIII's Wedding Gift
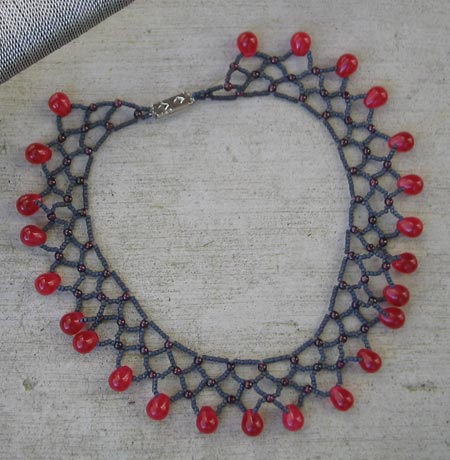
King Henry VIII had a way with the women. Of course he divorced one and executed two others. Another wife died giving birth to his only son. He ignored another due to her unattractiveness. He finally made it work with the final wife. Six marriages and all but one ended in death, divorce, and tragedy. This necklace wont make you a queen but will make you feel like one. If you make one for yourself, you wont be tempted to accept jewels from a King with a bad track record.
Difficulty
Boy Scout Dropout
Click here for definitions of difficulty levels.
Finished Measurements
This will vary depending on the choker length you prefer to wear. Take a choker that you own that fits you comfortably, and measure its length. This measurement will determine how long you will make your set-up tier. The necklace measures approximately 1.25 inches from the base of neck to the tip of the drop bead.
Materials
- 8 grams of Japanese Toho seed beads, size 11/0, color: matte slate gray (color A)
- Two 16-inch strands of 3mm round garnet beads (color B)
- One 16-inch strand of 7x7 red onyx drop beads (color C)
- 1 clasp
- Beading thread (Nymo D, Fireline Fishing Line - 14 lb test, or Silamide thread will work)
- Thread conditioner (Beeswax or Thread Heaven)
- Beading needle (with Fireline use Big Eye needle; with Nymo or Silamide use size 10 beading needles)
Project Notes
This necklace uses a simple form of netting stitch. The final piece has three tiers beginning with a row of upside down triangles, then a row of diamonds, and a final row of diamonds with red onyx drops as the centerpiece of each beading unit. I will refer to each triangle and diamond as a "beading unit."
 1. Measure out a 6 foot length of beading thread. If using Nymo or Silamide, condition the thread by running it over the thread conditioner. You may also wish to use the Nymo doubled. Thread the Nymo or Silamide onto the Size 10 needle. If using Fireline thread it onto the Big Eye needle.
2. String 3 A, one side of your chosen clasp, 3 A, 1 B and slide them all to the center of your thread. Tie an overhand knot. With one thread, go through all the beads again exiting out the B bead. You should now have one thread coming out of one end of the B bead, and one thread coming out the other end of the B bead.
 3. On the top thread, thread 7A, 1B. On the thread coming out of the bottom, thread 5A, 1B, 5A, and then go through the B bead on the top thread in the opposite direction as the top thread. Your bottom thread is now your top thread, your top thread is now your bottom thread. You have created your first beading unit. See Figure A.
4. Repeat Step 3 until your necklace measures to your desired choker length to include your clasp. On your top thread, thread 3 A and the other clasp end. On your bottom thread thread 3 A and go through the other clasp end in the opposite direction as the top thread. Go through this circle of beads once more and tie a knot. You will now need to secure both threads. Take one thread and work it back through your beads, tying 2 or 3 more knots along the way. Its best to do these knots next to B beads as you can hide the knots inside the bead. Repeat with the other thread.
5. Measure out another 6 foot length of thread. Condition if necessary and thread onto the beading needle. Go back to the first side of the necklace worked. Leaving a 5 inch tail, go through the beads following your thread path and tie 3 or 4 knots along the way to secure your new thread. You want the thread to exit the bottom B bead in the first beading unit. Your thread should exit the end pointing towards the rest of your necklace.
 6. Thread 5A, 1B, 5A and go through the next bottom B bead of the next beading unit. Continue until youve reached the end of the necklace. Youve now completed the second tier of the necklace. See Figure B.
7. You are now going to turn your work. Work your thread through the beads until you can bring the thread back through the bottom B bead of first beading unit of the second tier. Your thread should exit the side of the B bead facing the rest of the necklace.
8. Thread 5 A, 1C, 5A and go through the next bottom B bead of the next beading unit. Continue until youve reached the end of the necklace. Youve now completed the third and final tier of the necklace. See Figure B and think of that bottom bead as a red onyx drop bead. Work the thread through the bead path again, tying 3-4 knots along the way. Trim all thread close to the work. You may also want to secure the knots with a little clear nail polish if desired.
About
contact Jennifer • http://craftylilly.blogspot.com • legal info
![]()
home • antifesto • archive • errata • masthead • angstylvania • legal