

 |
 |
 |
 |
 |
 |
 |
 |
miss monster's favors > tetsujin no purasutekku > baby's first teratoma >
beaded pendant of blindness and insanity > i [heart] zombies > glaistig >
samhain surprise: silvanus
 Silvanus
updated 1/5/07
Silva, the Latin word for forest, accounts for the name of this Roman deity. As a child our house backed onto a forest where I hid amongst trees for hours listening to the ghostly reverberations of the forest. Once we lived in harmony with the woodlands and Silvanus was our King.
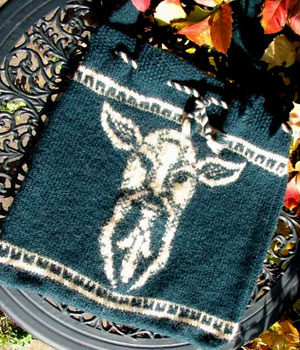
Isolate yourself in the woods for just an hour or two and the only frightening aspect is being left alone with your nagging human thoughts. If you don't interfere with his realm, Silvanus will let you pass through safely. If like me, you stop to pick some ripe wild strawberries, hope that you haven't awoken his wrath. Here is a fulled (felted) bag you might carry these treasures in if he lets you take them home.
Suggested Listening
A quiet forest. Go knit outside.
Difficulty
Strong Intermediate
Click here for definitions of difficulty levels.
Finished Measurements
Not essential to be precise, but before fulling:
Bag is about 19in/47cm W x 21 in/55 cm H
Shoulder strap is approximately 60in/152cm
After fulling:
Bag is 16in/40cm W x 16.5 in/42cm H
Shoulder strap is 32in/53cm
See instructions for fulling bag and shoulder strap separately for instructions on achieving best results and size.
Download
Silvanus chart (pdf format)
Materials
- Coldharbour Mill 100% Pure New Wool Aran [100% wool, 188yd/172m per 3.5oz/100g hank]; 1 hank in Honey (CC)
- Coldharbour Mill 100% Pure New Wool Aran [100% wool, 188yd/172m per 3.5oz/100g hank]; 3 hanks in Tartan Green (MC)
- 4.5mm knitting needles
- 4mm knitting needles for top bands if you are a loose knitter)
- Tub or other vessel for fulling (felting)
- Bath brush or other long implement for stirring and agitating
- Gloves or other hand protection when fulling (felting)
Gauge
18 sts x 20 rows over 4in/10cm in stocking stitch (stockinette stitch)
Desgin Notes
The yarn for this project was donated by the Coldharbour Mill which is a British Working Wool Museum. You can order yarns through their online shop or by telephone: (UK) 018884 840960
The Silvanus motif has been adapted form a chart from Enchanted Knitting by Catherine Cartwright-Jones and Roy Jones (ISBN 1-883010-21-7).
If you want to see this chart in full glory with twining leaves and other charts of Celtic, African, Romanian, Indian, and Scandinavian origin you will have to go and get the book, it is amazing!
Directions
 Front
Front
Using MC yarn and stocking stitch/stockinette throughout cast on 83 sts on 4.5mm needles and knit 8 rows.
Continue as below using both MC and CC as indicated on the charts. [Silvanus chart (pdf format)]
K 7 rows from the Bottom Border chart as follows:
2 edge sts, 4 st repeat from chart x 20, 1 edge st.
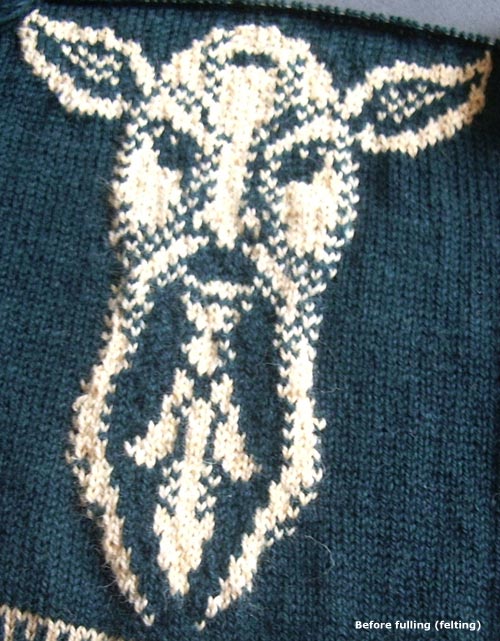
K a further 2 rows in MC then start Silvanus Chart in both MC and CC as follows: K 14 edge sts, 55sts from chart, 14 edge sts.
Continue in this way until all 73 rows from chart have been completed.
K 2 rows in MC.
K 7 rows from Top Border chart as follows:
2 edge sts, 4 st repeat from chart x 20, 1 edge st.
K 8 rows in MC.
Change to smaller needles if you are a loose knitter.
Continue in MC st and knit a further 16 rows as follows:
K1 *P1 K1 rpt from * to end.
Cast off.
Back:
Knit as for Front, but k a total of 77 rows in MC between Top Border and Bottom Border omitting the Silvanus Chart (unless you would like him on the front and back of the bag, which may require more CC yarn).
Shoulder Strap:
Using MC cast on 11 stitches and continue in Moss st (directions follow) until strap measures 60ins/152cms or desired length.
Moss stitch: K1 *P1 K1 rpt from * to end; repeat every row.
Making Up:
Weave in all ends. Place Front over back i.e. right sides facing and using MC yarn and a 4.5mm crochet hook join one side with slip stitch, then continue along bottom and up the other side then fasten off.
Alternatively you can sew sides and bottom together.
Drawstring:
Make two twisted cords as follows. Cut 3 lengths of MC yarn and 3 lengths of CC yarn about 3 ft. Tie ends of yarn together to make circle of yarn. Loop yarn over door handle, chair post, or chair leg. Insert a pencil, pen or dpn into loop at opposite end. Pull taught and twist yarn by spinning pencil/pen/dpn. Keep twisting until yarn is so tight it is almost pulling back on itself. Slide a finger half way along length of twisted yarn still keeping end taught. Fold yarn twist in half and put loop/pencil/pen/dpn together with loop over door handle (post or leg) Let go of finger holding halfway mark and allow yarn to twist on itself. Tie knots at the beginning and end of the cord to secure the twisted strands and cut below the knot to give it a small tassel.
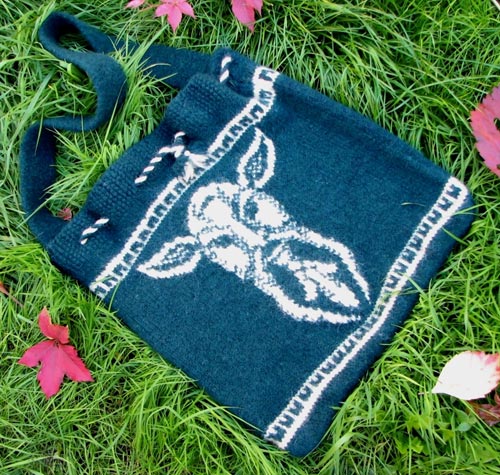
Now thread the twisted cord in and out of the centre of the top moss st band of the bag by pushing the cord through the stitches at even intervals so that both ends of the cord come out near centre front of bag. There was no need to make eyelets whilst knitting as eyelets will be formed here when felting the bag.
 Fulling (Felting):
CAUTION: HOT WATER! Wear gloves to protect your hands but do take care as you can still be burned by hot water so do not plunge your hands right in the hot tub. This is what the long implement is for so avoid contact with the bag and the water whilst it is in hot water.
Step 1: Fill a tub with soap flakes and extremely hot water (see caution above)
Step 2: Drop bag in water face up and use your long handled implement to agitate the water, leave for about 30 minutes.
Step 3: Empty tub and fill with cold water and repeat step 2
Rpt steps 2 and 3 once more
Step 4: Spin very lightly then reshape damp bag
Step 5: Place in tumble dryer on highest setting and dry bag for 10 mins, check results, dry again and repeat this until bag is still damp but you are happy with the degree of fulling.
Step 6: Dry flat.
Following these steps you can gently full by hand and repeat any steps to get a greater degree of fulling. Be careful if you decide to use a machine, with less control and too much fulling the Fairisle motifs can become warped or indistinct.
Repeat the fulling process with the strap until it is firm enough, i.e. it won't stretch too much when using the bag.
I fulled my shoulder strap separately because I wanted to achieve a higher degree of fulling which was possible as there are no motifs on this part. I also wanted to make the strap the perfect length so repeated the steps until I achieved this. The bag retained some faint stitch definition whereas the strap didn't. I like both results but I am curious as to how far I could have gone. At a later date, I might be brave enough to go a step further with fulling the bag but for the moment I halted where it felt safe. The time it took to knit is still fresh in my mind and I'm not brave enough to take a chance with it yet
Finishing:
Attach shoulder strap to bag by sewing it to the inside of the top bands at each side.
About
contact Erssie • http://www.erssieknits.com • legal info
![]()
home • antifesto • this issue • archive • submit • errata • masthead • contact us • legal