

 |
 |
 |
 |
 |
 |
 |
 |
miss monster's favors > tetsujin no purasutekku > baby's first teratoma >
beaded pendant of blindness and insanity > i [heart] zombies > glaistig >
samhain surprise: silvanus
 Miss Monster's Favors
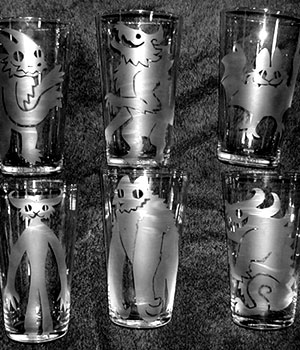
Miss Monster stays busy making monster costumes, plush monsters, wooden monsters, and painted monsters. This is not to say that Miss Monster is a fuddy-duddy who can't appreciate a Monster Bash! Here's a sample of what her guests can expect to find waiting for them when she hosts a Wild Rumpus.
Suggested Reading
Where the Wild Things Are
by Maurice Sendak
Difficulty
Slash and Burn
Click here for definitions of difficulty levels.
Finished Measurements
Varies depending on materials used and monsters drawn.
Download
Monster template (pdf format)
Materials
- Clear glasses (make sure they are not Pyrex)
- Popsicle sticks OR tounge depressors
- Etching cream (buy it at craft stores; I use Armour Etch, available in three sizes)
- Scissors
- Permanent marker
- Sticky-backed vinyl sheets/roll (comes in the cheap form of drawer liner
sheets; it can also be bought under the name Contact Paper but will
cost you more) - Sharp hobby knife
- Access to a sink
- Old towel OR paper towels
Directions
Please read this safety information before starting the project.
Step 1:
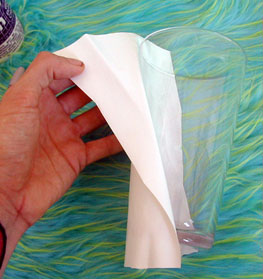
Cut your fine self a 7" square of vinyl. Peel off its paper back, then stick it on the glass. Squish down any air bubbles.
Step 2:
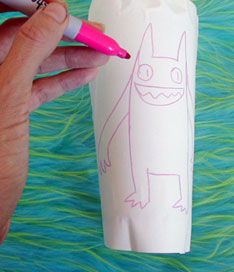
Grab your permanent marker and draw a monster, skull, ghostie or
ghoulie! Make sure the marker is permanent or the ink will just rub
off. You can use the downloadable monster template to guide you, or just freestyle it.
Download: monster template (pdf format)
Step 3:
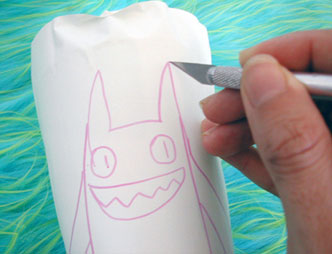
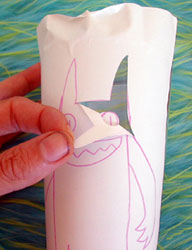
Cut out your drawing with the hobby knife. You want to cut around the shape
like you are making it's silhouette. Make sure you cut out his eyes
and teeth!
Step 4:
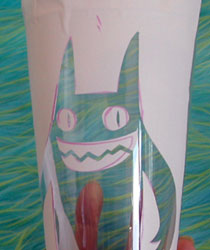
Peel off the parts you want to be etched. Use your knife blade to pick
up a corner of the vinyl and pull gently. See how I left him some eyes and teeth? Those parts won't etch and will
add cool detail to the monster!
Step 5:
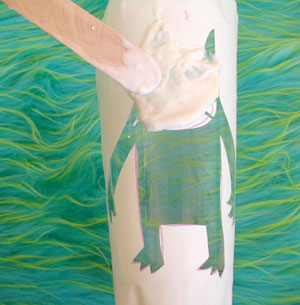
Get your popsicle stick and start smearing on the etch cream. Try to
cover the monster quickly and evenly. Don't be afraid to glop it on! Let your glass sit for a few minutes, as recommended by the directions on the etch cream.
Step 6:
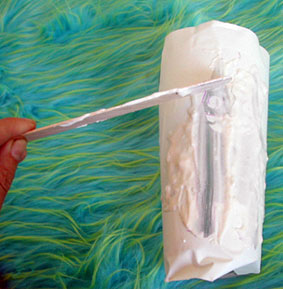
Okay now that the cream has had time to work, grab a fresh popsicle
stick and scrape off the extra cream. You want to scrape gently so you
don't move any vinyl and put the cream back into the jar it came in.
It will always work even after you've used it over and over - just don't
let it dry out.
Step 7:
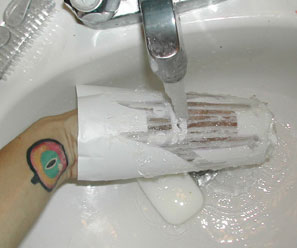
Now hit the sink or bathtub and run water over the glass at full
blast. I use my hand to rub the cream off the glass while it's under
the water stream. It is acid but it will not cause burns or make your
skin fall off. It's mild stuff, but don't get it into a cut or on
irritated skin. Try not to wash your eyeballs with it either. Make
sure all the acid is off the glass. Check the back and inside of the
glass for stray cream.
Step 8:
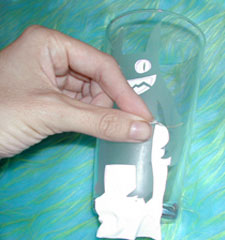
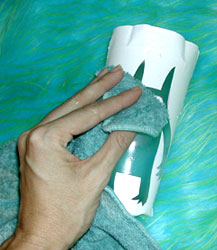
Got all the cream off? You sure? Good! Dry it off with an old
washcloth, then peel the rest of the vinyl away. So cool!
Step 9:
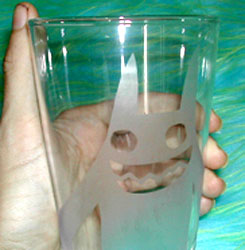
After you get the vinyl off, give it another wipe with a damp paper
towel and check out your glass! The image can't be seen when the glass
is wet so dry dry dry! It's tough to get good photos of glass, but notice the eyes and teeth
in my monster. You can use the same method of leaving certain parts on
to make lines and or patterns.
Step 10:
Bask in your awesomeness. These will make halloween party favors that people can really use. You could even put the year on the back of the glass, do them every year and watch them become collector's items! If you want to get super fancy, fill the glasses with halloween candy, fake moustaches, wax lips, or other goofy awesome halloween stuff, like the blood of the innocent!
About
contact Miss Monster • http://www.missmonster.com • legal info
![]()
home • antifesto • this issue • archive • submit • errata • masthead • contact us • legal