

 |
 |
 |
 |
 |
 |
 |
 |
pillow talk > malice > sick fuck
click image to enlarge
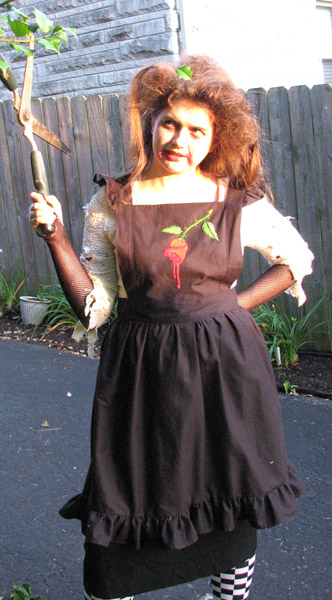
Painting the Roses Red
Zabet Stewart (photo)
Brittany Griffin Smith (model)
Jane Roth (embroidery)
'Who are YOU?' said the Caterpillar.
This was not an encouraging opening for a conversation. Alice replied, rather shyly, 'II hardly know, sir, just at presentat least I know who I WAS when I got up this morning, but I think I must have been changed several times since then.'
'What do you mean by that?' said the Caterpillar sternly. 'Explain yourself!'
'I can't explain MYSELF, I'm afraid, sir' said Alice, 'because I'm not myself, you see.'
—Lewis Carroll
This fully customizable Gothic Lolita apron gives you the chance to be whoever you choose: vamp, vixen, lunatic, or pinup. Just stitch on a persona.
Suggested Listening
"Color Me Blood Red" by Malice Mizer
Difficulty
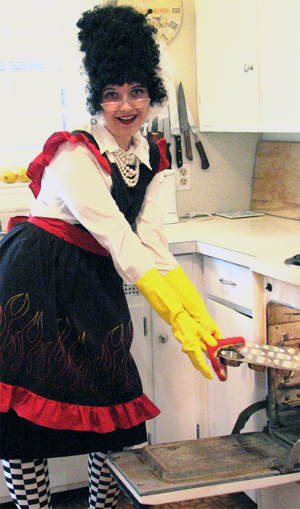
Hell's Kitchen
Zabet Stewart (photo)
Brittany Griffin Smith (model)
Robyn Wade and Zabet Stewart (embroidery)
Bring Out the Gimp
Click here for definitions of difficulty levels.
Finished Measurements
Customized to your measurements.
Download
Painting the Roses Red and Hell's Kitchen Templates and Worksheet (PDF format)
Malice Automagic Measurement Maker (Automagic version of the worksheet; PDF format)
Materials
- Cotton fabric (such as that suitable for quilting)
- 2 yards of 44" wide fabric for waists up to about 36"
- 3 yards of 44" wide fabric for waists from 37"-54"
- 4 yards of 44" wide fabric for waists from 55" or more
- 1 yard of 44" wide fabric in contrasting color for contrasting ruffles and waistband (optional)
- Sewing thread to match fabric color(s)
- DMC 6-strand cotton embroidery floss in:
- (for Painting the Roses Red) 1 skein each of #901 (dark green), #703 (light green), #869 (greenish-brown), #321 (bright red), #304 (red), #815 (dark red)
- (for Hell's Kitchen) 2 skeins each of #321 (red), #900 (orange), and 1 skein of #972 (yellow)
Design Notes
Due to the worksheet nature of this pattern, all measurements are in inches. To convert your measurements from centimeters, divide your measurements by 2.54 and round to the nearest tenth.
You do not need to factor in seam allowances, as we have done that for you. All measurements in the pattern include seam allowances of .5".
All hems should be folded in .25", then folded again another .25", pinned, and sewn.
We STRONGLY recommend you embroider your cut pieces before sewing them!
Don't know how to do a certain stitch? Check out the Glossary of Techniques.
Need help choosing a needle? Read this guide.
The AntiCraft assumes any well stocked sewing room to have certain things on hand. (Click for our basic sewing items list.)
Prepare Fabric:
Wash, dry, and iron fabric before sewing. (See Ironing Sucks! for more on the why and how.)
Measure Yourself:
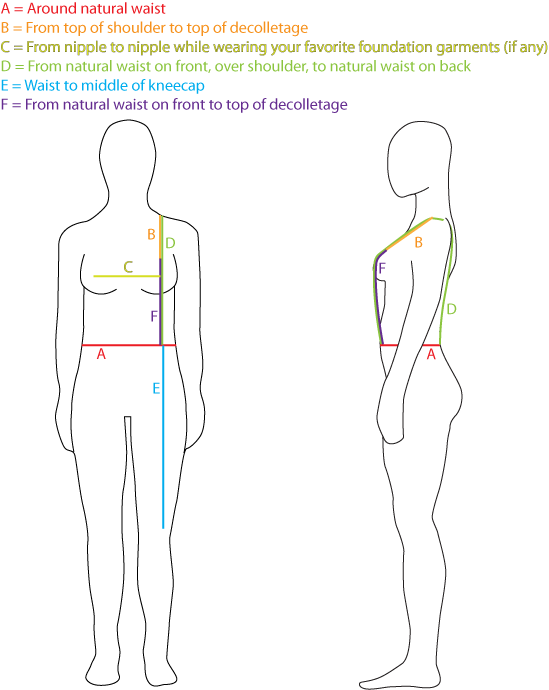
Measure Yourself
click image to enlarge
Measure yourself in inches as specified in A-F and take notes. Use the image on the right as a guide. It is also included in the downloadable temples (and is probably easier to read).
- A = Around natural waist
- B = From top of shoulder to top of decolletage (or however high up you want the apron to come in the front)
- C = From nipple to nipple while wearing your favorite foundation garments (if any)
- D = From natural waist on front, over shoulder, to natural waist on back
- E = Waist to middle of kneecap
- F = From natural waist on front to top of decolletage (or however high up you want the apron to come in the front)
Cut Out Fabric:
Sample Piece Layout
click image to enlarge
Cut out pieces 1 -7 as detailed below. You may want to pin a note to each piece after cutting so you don't forget its number. There is a worksheet and an example of how to lay the pieces out on your frabric to help you included in the Template PDFs. There is also an automagical version of the worksheet that let's you input your measurements and calculates the piece sizes below for you as well as a few other measurements we use in the pattern.
#1 Skirt
Cut a rectangle that is (1.5A + 1") by (E - 3").
#2 Waistband
Cut a rectangle that is (.75A + 1") by 5".
#3a and #3b Ties
Cut two rectangles that are each 32" by 5".
#4 Bib
Cut a rectangle that is (C + 1") by (F + 1"). Depending on how high up you want the bib to come, this might be more like a square.
#5a and #5b Shoulder Straps
Cut two rectangles 4" by (D + 1").
#6 Skirt Ruffle
Cut a rectangle (3A + 3") by 4". You may need to piece this together—we did! If so, try to make it in three pieces (even if two would do) so that there isn't a seam in the ruffle that falls at the exact front of the skirt.
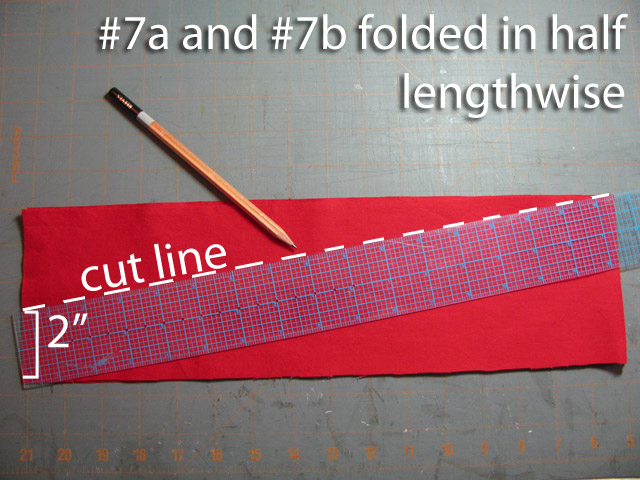
Cutting #7a and #7b
click image to enlarge
#7a and #7b Shoulder Ruffles
Cut two rectangles (4B") by 4.5". Fold 7a and 7b in half lengthwise. Lay folded pieces on top of each other with folded ends together on the right and cut ends together on the left. On cut end, measure in and mark 2" from the bottom long edge. With a straightedge, draw a line from the mark to the top point of folded edges. Cut along line. You may want to pin pieces together before cutting if the fabric crawls too much, or cut a and b separately.
Sew Apron Skirt:
Hem along one long edge of Skirt Ruffle Piece #6. On the other long edge, run two lines of basting stitch about .25" in. Pull the basting stitch threads' excess from either end to gather the fabric. There are two threads that make up each basting stitch; one will let your gather the fabric and the other will not, so be a little gentle when you first start until you know you have the right threads. Gather until you have reduced the length of Skirt Ruffle Piece #6 to 1.5A" (= Measurement I).
With RS facing, pin gathered edge of Skirt Ruffle Piece #6 to a long edge of Skirt Piece #1 (they should be the same length after gathering the ruffle), distributing fullness of the ruffle evenly. Seam across. You now have a Skirt Piece #1 with a ruffle at the bottom. If you find your ruffle wants to flip up too much, sew a topstitch along the bottom of Skirt Piece #1, as close to the seam of where it meets Skirt Ruffle Piece #6 as possible. This will catch the extra material left from the seam allowance and tack it down so that the ruffle will drape downwards, not straight out or flipped up.
Hem the right and left sides of this piece, including the ruffle.
Run two lines of basting stitch across the top of Skirt Piece #1, and gather until it is reduced to .75A" (= Measurement II) wide.
Sew Waistband:
With RS facing, join one short edge of Tie Piece #3a to one short edge of Waistband Piece #2. Repeat with Tie Piece #3b on the other short end of Waistband Piece #2. You now have one very long, narrow piece.
Again with RS facing, fold in half lengthwise and pin. Seam the short edge and the long edge of Tie Piece #3a, stopping where it joins Waistband Piece #2. Repeat for piece Tie Piece #3b. Turn right side out and iron flat. Turn in the raw edges of Waistband Piece #2 so that the width of Waistband Piece #2 matches the widths of Tie Pieces #3a and 3b. Iron flat to create a nice crease.
Attach Apron Skirt to Waistband:
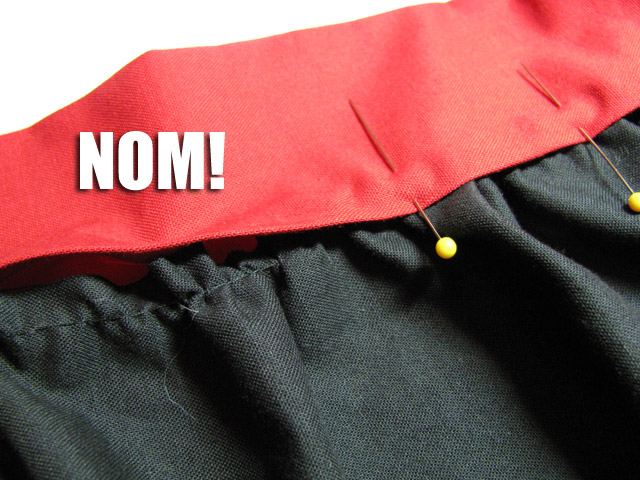
That red waistband is like a mouth eating the black skirt!
click image to enlarge
Insert gathered top edge of skirt into open pocket at bottom of waistband. Fold in raw edges of Waistband Piece #2 in to match 3a and 3b (along the crease created during ironing) and pin together, distributing fullness evenly and making sure that waistband is smooth. Sew near the edge across opening of Waistband Piece #2 to match seams on Tie Pieces #3a and 3b.
Sew Apron Top:

Figure 1
click image to enlarge
Hem one of the edges of piece 4 that is III (C + 1"). This will be the top of the bib.
Fold Strap Pieces #5a and #5b in half lengthwise so they are long and even skinnier. Iron flat.
Align Bib Piece #4's raw edge with the short edge of Strap Piece #5a on the left and Strap Piece #5b on the right. Strap pieces should have open edges facing the Bib piece. See Figure 1 for clarification (included in the Template download for easier reading).

Figure 2
click image to enlarge
Insert the bib .5" (1.27cm) into each strap and pin. See Figure 2 for clarification (included in the Template download for easier reading).
Continue pinning down Strap Pieces #5a and #5b until their ends.
Sew seams along pinned edges of Strap Piece #5a and #5b.
Now we'll attach the shoulder ruffles. Hem the outer (angled) edge of Shoulder Ruffle Piece #7a. Run two lines of basting stitch on inner (straight) edge and gather until Shoulder Ruffle Piece #7a is half its original length, or 2B" (= Measurement IV).
Repeat for Shoulder Ruffle Piece #7b.

Pinning Shoulder Ruffles
click image to enlarge
Position and pin Shoulder Ruffle Piece #7a on shoulder strap 5a starting at the top of bib. There should be .5" of overlap, giving you plenty of room to sew this seam after pinning. Adjust fullness evenly and be sure the widest part of Shoulder Ruffle Piece #7a falls at the top of the shoulder, B" (= Measurement V) inches from the top of Bib Piece #4.
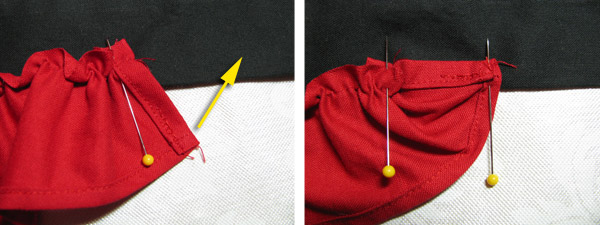
Pinning the Ruffle Point
click image to enlarge
Once Shoulder Ruffle Piece #7a is pinned on, take the hemmed points of the outer (angled) edge and pull them (like a fan) to the inside of Strap Piece #5a and pin down.
Sew seam starting at one end of Strap Piece #5a, securing then entire length of Shoulder Ruffle Piece #7a, and finishing at the end of Strap Piece #5a.
Repeat for Shoulder Ruffle Piece #7b, mirrored to match.
Attach Apron Top to Apron Skirt:
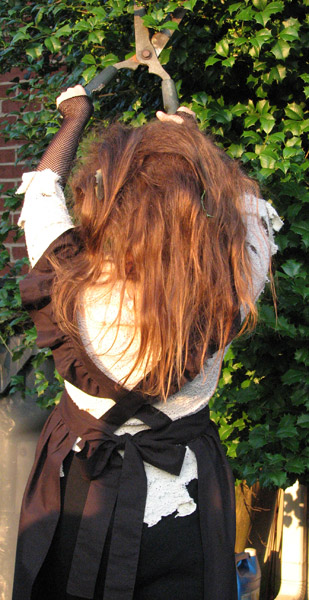
The Back
click image to enlarge
Place Apron Skirt WS up on your sewing table. Center Apron Top, also WS up, on Waistband Piece#2. Overlap Apron Top onto Apron Skirt by .5" and pin.
Sew seam, beginning at the furthest edge of Tie Piece #3a, across Waistband Piece #2, to the end of Tie Piece #3b. You want this seam to match the seam on the bottom of the waistband that was made when you attached Waistband Piece #2 to the Skirt Piece #1.
Next, using friend or dressmaker's dummy, try on the apron, tying waist ties snugly. Cross shoulder straps to make an X on the back and pin ends of straps to ties, approximately 1" from where the ties meet the waistband, adjusting for fit as necessary. Too-loose straps should be pinned closer to the waistband; too-tight straps should be pinned further from the waistband. Sew straps to ties and trim away any excess strap fabric.
Finishing
Iron or steam wrinkles out. Wear, trying not to eat or drink anything that doesn't belong to you.
About
 contact Raellyn:
• legal info
contact Raellyn:
• legal info
![]()
home • antifesto • this issue • archive • submit • errata • masthead • contact us • legal