

 |
 |
 |
 |
 |
 |
 |
 |
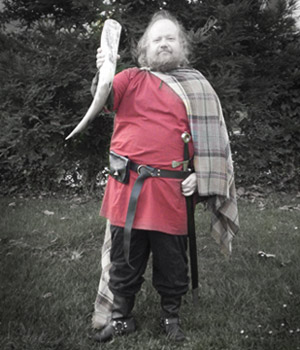
James Huber (model)
Carin Huber (photo)
With the possible exception of shoes, the tunic was the first "complicated" garment known to humankind. Previously, clothing was a flat piece of fur or leather wrapped around the wearer. With the invention of sleeves, early man could keep his arms protected from excess sun or wind, without cloaking himself in heavy whole skins which made it difficult to move.
Tunics are still worn today by fashionable people, who appreciate the simple lines of the garment. They're perfect for costuming, whether for re-enactment, cosplay, or Hallowe'en. They can be made without any pattern at all, and the process will teach you a bit about how clothing and pattern designs are created.
This project is part one of four, with the next three appearing over the year. Have no fear—you will be able to make a completed tunic, sized to fit you properly, with the instructions in Part One alone. Parts two through four will teach you how to alter the basic pattern to change the neckline, sleeve length and style, and the overall shape of the garment.
Suggested Watching
The Lion in Winter (1968, rated PG; or 2003, unrated)
Difficulty
Scoutmaster Euclid
Click here for definitions of difficulty levels.
Finished Measurements
Custom.
Download
Timeless Tunic Worksheet (pdf format)
Materials
- Fabric - a woven cotton or cotton blend, 45" to 60" wide (see Design Notes)
- Thread - all purpose, for machine sewing
Design Notes
Read the instructions through at least once before purchasing your fabric! Once cut from the bolt, fabric cannot be returned.
All measurements in this article are given in inches and yards. To convert to metric, remember that 1"=2.5cm, and 39"=1m.
You can, of course, make your tunic out of any fabric you like, however, woven cotton and cotton blends are the easiest with which to work. They are not slippery like pure polyester fabrics, they shrink minimally in the wash, unlike rayon and wool, and they don't stretch like knits. They are also machine washable.
In these instructions, I refer to the "right side" and "wrong side" of fabric. This simply means the front or back of the fabric, as it will show on the finished garment. On a printed fabric, this will be very obvious, as the print usually only looks good on one side. Some fabrics with different colors woven in look different, but equally good on both sides. You must decide which is the "right" side with these. Some fabrics are made with a weave which appears different on the two sides, and care must be taken to ensure that the correct side is faced out on all pieces, or the garment will look subtly strange. Solid colored broadcloth looks the same on both sides, so it does not matter which side is "right."
When sewing pinned fabric, do not sew over the pins. Doing so will result in bent or broken pins and needles, and could potentially send bits of sharp metal flying into your face! It can also cause damage to your sewing machine. Remove pins as you sew, pulling each pin as it approaches the needle.
To find the amount of fabric you will need to buy, you need to decide how long you want your tunic to be. (This would be a good time to download and print out the Worksheet, found above.) Have a friend measure, in inches (not feet), from the top of your shoulder to your desired length. For the purposes of this project, this should generally fall between mid-hip and knee length. Multiply this measurement by 2, then add 22 inches. Now, divide this number by 36 (calculator use is encouraged here) to find how many yards you will need to buy. Round up to the nearest half yard.
Prewash and press your fabric before beginning this project. (Thinking about skipping this step? Read Ironing Sucks! first.)
The AntiCraft assumes any well stocked sewing room to have certain things on hand. (Click for our basic sewing items list.)
Taking Measurements:
Following the "Timeless Tunic Worksheet," have a friend help you take your measurements. Don't let vanity make you suck in your gut, or your tunic won't fit! In fact, this wouldn't be a bad time to puff out your chest a little, or flex your arm muscles. Each measurement should be taken around the fullest part of that area. You don't want to be splitting seams in your tunic.
A note to "fuller figured" people. I am one of you. I know whereof I write. Some of your measurements may change drastically when you bend or sit, especially at the hip and waist. Take these measurements sitting as well as standing, and compare them. You want to go with the larger measurement here. Trust me.
Compare your Chest, Waist, and Hip measurements. Transfer the largest number to the space marked "Largest."
Marking and Cutting the Fabric:
Lay out your prepared fabric (you did prewash and press it, right?) on your cutting table, with one end of the fabric near one end of the table and the other end of the fabric on the floor at the opposite end of the table. A couple cans of soup from the pantry (make sure they're clean) can serve as weights, to keep the fabric in place. Trim off any stray threads. If the ends of the fabric are ragged or uneven, trim them as straight across as you can.
Now, work out the formulas listed under "Translating Measurements to Fabric" on the Worksheet. We'll discuss them one by one.
Length Formula: Length measurement + 2 inches.
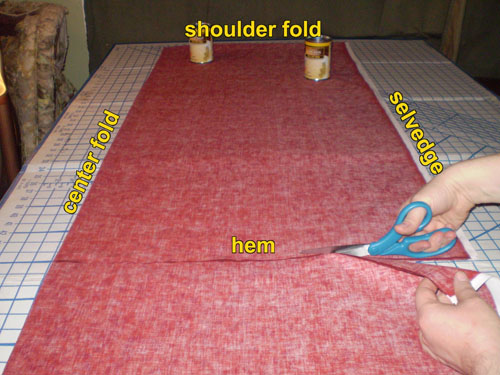
Figure 1
Carin Huber (photo)
click image to enlarge
Measure this from the end of the fabric along the center fold, and mark it, either with chalk or just with a pin. Fold the fabric at this mark, and pull it up further onto the table, so that it lies smooth and flat, with the center folds matched up. The cross-wise fold you just made is the shoulder fold. Cut off the excess fabric to match the end. (fig. 1) Pin all four layers together in several places along the center fold and the selvedges, as well as in a few random spots toward the middle of the fabric. This is to keep the layers from moving while you continue working. Set the excess fabric aside. You'll need it later.
Sleeve Formula: Bicep measurement divided by 2, then add 1.5 inches.
Measure this from the shoulder fold toward the cut end and mark with chalk. Mark this at the selvedge and in one or two places a few inches in from the selvedge.
Body Formula: Largest measurement (of chest, waist, or hip) divided by 4, then add 1.5 inches.
Measure this from the center fold toward the selvedge, and mark with chalk. Mark this at the cut ends and in several places along the length, toward the sleeve marks.
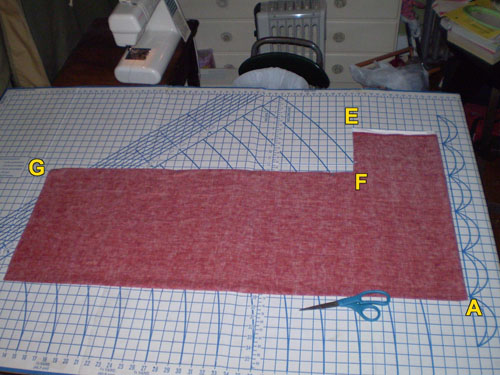
Figure 2
Carin Huber (photo)
click image to enlarge
Sketch the body and sleeve lines in as shown by line E-F-G on the Worksheet. Place pins through all four layers of fabric along these lines, on the sides toward the center fold and shoulder fold, then cut along the lines. (fig. 2) Place the fabric marked as "waste" on the Worksheet in your scrap pile.
Keyhole Neck: The corner where the center fold and the shoulder fold meet corresponds to A on the Worksheet. Measure 4 inches from A along the shoulder fold and mark. This corresponds to B. Measure 4 inches from A along the center fold and mark. This corresponds to C. Sketch in a quarter circle between B and C. (It doesn't have to be perfect, just close enough.) Pin the top two layers of fabric together along the outside of this curve.

Figure 3
Carin Huber (photo)
click image to enlarge
Cut through the shoulder fold from A to B, then cut the top two layers only along the curve from B to C. You should end up with a waste piece shaped like a half circle when you open it out flat. (Figure 3.) Now, measure 4 inches from C along the center fold and mark. This corresponds to D. Cut through the center fold between the top two layers only from C to D.
Facing the Neck:
Remove all pins from the cut fabric and open it up flat, into a single layer, right side up. It will be roughly cross shaped, with the neck hole in the middle. Now, remember that excess fabric you cut off when you cut the fabric to length? Take that and roughly cut it in half along the center fold. You only need half of it, and that's generous. This will be your facing fabric. Discard the rest, or turn it into a tunic for your Bad Juju.
Lay your facing fabric over the neck hole, right side down. Try to line up the selvedge of the facing more or less parallel to the selvedge of the sleeve, so that the grains of the fabrics line up. You can line them up perfectly by measuring the distance between the facing selvedge and the sleeve selvedge in two different places, but, for this project, it will be fine if you just "eyeball" it. Make sure that the facing overlaps the neck hole by at least 2 inches everywhere, including the bottom of the slit at D. Smooth it out and pin the layers together at several points.
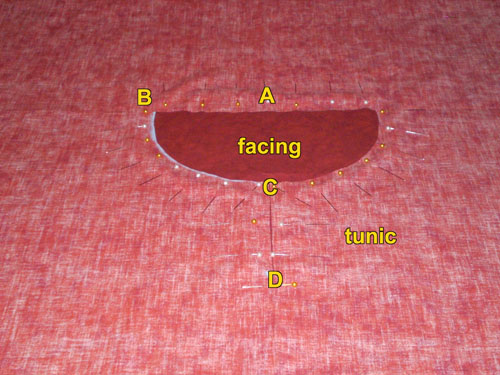
Figure 4
Carin Huber (photo)
click image to enlarge
Now, flip the whole thing over, so you can see the neck hole again. You should be looking at the wrong side of the tunic fabric, with the right side of the facing fabric showing through the neck hole. (fig. 4) Lay it out smooth and flat, making sure that the edges of the facing are also flat underneath the tunic. Now, pin the hell out of it! Put pins every inch or so around the curve of the neck, across the back, and along both sides of the slit front.
Turn the whole thing over once more, and remove the pins you put in that side to keep the facing fabric in place while you turned it to pin the neckline.
Take the tunic to the sewing machine. With a straight stitch, and a quarter inch seam allowance (use the right edge of the foot as a guide), sew around the neck hole, being careful not to get loose facing fabric in the seam. Start and end the seam with a back stitch to secure it. At the slit front, sew down one side of the slit, go about four stitches past the bottom of the slit and stop. Put the needle down through the fabric, raise the foot, rotate the fabric 90 degrees, and put the foot back down. Sew about four stitches past the slit, stop, lower the needle, raise the foot, and turn to go up the other side of the slit. Where the slit meets the opening, do the same stop-and-turn to get around the corners.
Take the tunic off the sewing machine. Check to make sure you didn't catch any facing fabric you didn't want to in the seam. (If you did, use a seam ripper to cut out just the stitches holding the caught fabric, then re-sew this section.) Pinch up the facing fabric in the middle of the neck hole and cut a small hole to fit your scissors through. With one hand under the neck hole to keep loose fabric out of the way, carefully trim away the facing to match the neck opening, including the slit. I reiterate, be careful, not just to avoid cutting the fabric wrong, but to avoid cutting yourself, as well!
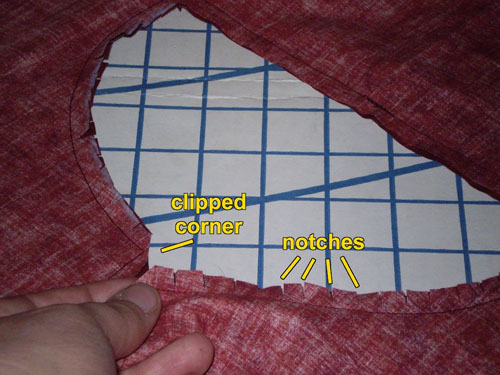
Figure 5
Carin Huber (photo)
click image to enlarge
Once the neck hole is open again, use just the tip of the scissors to cut notches every half inch or less in the curved part of the neck, close to, but not through, the line of stitching. Clip notches into the corners at the bottom of the front slit, and where the curve meets the straight back of the neck hole, as well. Carefully clip off the corners of the seam allowance where the slit meets the curve, at a 45 degree angle. (fig. 5) This is done because when an inside curved seam or inside corner is sewn and then turned right side out, the seam allowance needs to spread. It can't do that if the curves and corners aren't clipped. For an outside curved seam or outside corner, turning the seam right side out bunches the seam allowance up inside, making the seam lumpy. Clipping these seam allowances allows the tiny tabs formed to overlap and lay flat, or simply removes excess fabric from the area altogether.
Pull the facing through the neck hole to the inside of the tunic. Poke the corners at the front of the neck out, using the tips of your closed scissors, if necessary, to make them properly pointed. Place the tunic wrong side up on the ironing board, with the facing visible, and press the edges of the neck hole, so they are crisp. Place a few pins around the neck to keep the facing from shifting.
Take the tunic back to the sewing machine, and top stitch around the neck hole, a quarter inch from the edge, just as you did when you sewed the facing to the neck in the first place. Start and stop the top stitching at the center back of the neck, using a back stitch to secure the ends of the stitching.
If your thread breaks, or there's some other reason you have to stop and start someplace other than the center back, with a little patience, you can make the stop/start point nearly invisible. Pick out, but do not cut off, the last few inches of stitching. By tugging gently on the thread on the inside of the neck, you can pull up a loop of the outside thread, then pull it through completely with your fingers. Tie the two ends in a secure square knot, close to the facing, and apply a tiny drop of clear nail polish or Dritz Fray Check to the knot. Trim off the ends of the thread, close to the knot. Put the tunic back on the sewing machine, and carefully place the needle down through the same place where the stitching stops, or as close as you can get it. Continue sewing the top stitching to the end. When you finish the top stitching, go back to where you restarted it, and pull the outside thread through to the inside, tie the threads, seal the knot, and trim the thread ends. No one will ever notice the break in stitching.
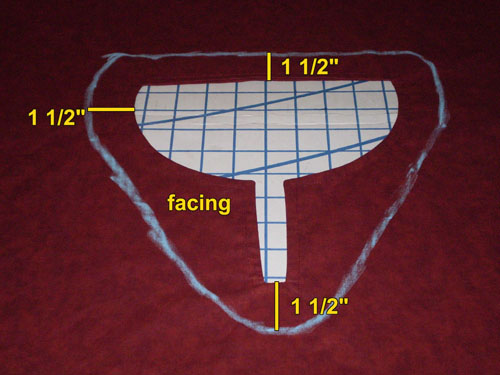
Figure 6
Carin Huber (photo)
click image to enlarge
Now, sketch a line on the facing parallel to, and about an inch and a half away from the back of the neck, and starting down around the curve, but angling toward the bottom of the slit. Take the line around the bottom of the slit, still 1 1/2 inches away from it, and back up the other side, in the same fashion. (fig. 6) Carefully trim off the excess facing along this line. Hold the tunic up by the facing, so that the body hangs away from the scissors while you cut.
With a zigzag stitch, sew around the cut edge of the facing. Hold the facing to the right, wrong side up and passing under the needle, with the body of the tunic laying away to the left, as you sew. Zigzagging over, or close to the edge like this will keep the facing from raveling with wear and washing.
Okay, the hard part's done. Take a break, get up from the sewing machine for a few minutes and stretch. Really, it's not good to sit in one position for too long, no matter what you're doing.
Feel better? Good. Let's continue.
Sewing the Body and Sleeves:
Fold your tunic in half at the shoulder fold, wrong side out. This style of tunic is called a "T-tunic," and now you can see why. Place a few pins along the edges to secure them.
With a straight stitch and a half inch seam allowance, sew up the sides of the body and the undersides of the sleeves. Remember to back stitch at the beginning and end of each seam, and to stop, set the needle, raise the foot, and rotate the tunic at the corners where the sleeves meet the body.
This is a good time to try the tunic on for fit. It should fit comfortably everywhere, and should not bind when you bend or sit. If it's too large, it's simple enough to resew the seams a little smaller, although, really, there's no such thing as a tunic that's too large. My skinny friends love to wear my tunics because of how the fabric drapes over them. If you must have it smaller though, keep these numbers in mind: if you sew the body seams 1/4 inch farther in than originally, you will reduce the size by one inch; sewing the sleeve seams 1/4 inch farther in reduces the size of the sleeves by 1/2 inch. If your tunic is too small, you can get another inch in the body by sewing the seams 1/4 inch closer to the cut edges; doing the same with the sleeves will give you another 1/2 inch of room. Hopefully, you won't need more space than this right now, because that's a matter for a later issue of this project.
If your tunic fits properly, clip the seam allowance where the sides meet the sleeves, just like you did at the bottom of the slit in the neck hole. Sew the side and sleeve seams again with a zigzag stitch, sewing over or close to the cut edges of the fabric, to prevent fraying.
Hemming the Tunic:
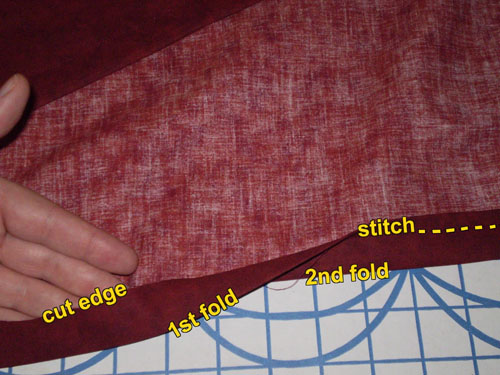
Figure 7
Carin Huber (photo)
click image to enlarge
Now, turn the bottom edge of the tunic up to the inside one inch, and press in place. When that is done, turn it up again, so that the cut edge is hidden inside the hem, and press again. (fig. 7) Place a few pins around the hem, and top stitch with straight stitch, sewing 1/4 inch from the first fold.
You may hem your sleeves in the same manner, or not, depending on how good the selvedge looks. If the selvedge is woven tightly and neatly, and the color is even, you may decide to leave well enough alone. Most prints, however, have at least one white selvedge, with information on the design printed along this space. Whatever you decide, do the same thing to both sleeves, so that they match.
Congratulations! You've just made a basic tunic.
About
 contact Carin:
• legal info
contact Carin:
• legal info
![]()
home • antifesto • this issue • archive • submit • errata • masthead • contact us • legal