Hardware Niddy Noddy
by Robyn Wade
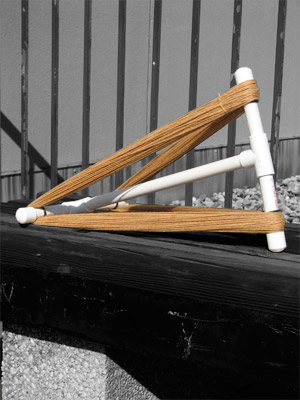
I came up with the idea to build my own niddy noddy after looking at my collection of recycled and thrift store yarn wondering how much yarn I actually had. I looked online for a niddy noddy, but the adjustable ones that I favored were close to $50. I decided to take matters into my own hands and off I went to the hardware store in search of a low-cost solution. My original plan was to use dowel rods, but a walk through the plumbing isle persuaded me to go with PVC piping instead. The total cost of all of my parts for an unpainted niddy noddy was under $5
Mood Enhancers
Anything on the DIY network. Not that we're suggesting you watch TV, since TV is the root of everthing that is evil and wrong. But if you were going to watch it anyway....
Skills Used
Gluing
Inserting Tab A into Slot B
Materials and Tools
½ inch (12mm) diameter PVC pipe
2 ½-inch slip tee connectors
4 ½-inch slip end caps
4 O-rings to fit securely around your piping (7/8)
Fine grain sandpaper (optional)
paint formulated for plastic (optional)
Download
"Easy to Assembly" pictoral instructions (PDF file; 204k)
How to Use a Niddy Noddy (PDF file; 196k)
Instructions
Have the PVC piping cut into 4 pieces that are each 4.5 inches (11cm) in length. These will be the arms of your niddy noddy. Unless you are a plumber and own a set of pipe cutters, make sure to get the piping cut at the hardware store; it will only take a minute and it will be well worth the wait. Use the chart below to determine the body length. Since the body pieces are not permanently attached in this pattern you can interchange these sizes to suit your needs. Most hardware stores sell the piping in 10 sections for under $2 which is enough for 8 arms and several body sizes so this is a great project to do with a friend.
| Length of Hank | Length of Body Section |
| 1 yard | 5.5 inches |
| 1 meter | 6.5 inches or 16.5cm |
| 1.5m or 60 inches | 12 inches or 30.5cm |
| 2 yards | 15 inches |
| 2 meters | 16.5 inches or 41.5cm |
Once you have all of you pieces cut, assemble your niddy noddy.
Step 1: Slide the short pipe pieces through the tee connectors. Add end caps to all exposed cut pipe ends.
Step 2: Side the longer pipe piece into the remaining holes on the tee connectors. You now have a piece that looks like a capital letter I.
Step 3: Twist either the top or bottom (short pipe piece) of the I 90º. Your niddy noddy is now ready to use.
Using your niddy noddy: Wrap your yarn around the niddy noddy from point A to B to C to D and back to A. Repeat until you run out of yarn, counting the times you pass point A. Multiply that number by the length of your wrap (determined by the length of the body of the I; see chart above) to get the length of your yarn. Tie waste yarn around your hank at the four arms to hold your hank together. Then, remove the hank from your niddy noddy by removing one of the arms. Twist your hank and pull one end through the other to make a nice, yarn store style hank of yarn.
If you want to remove the factory text from your piping, simply go over it with the fine grain sandpaper. You can also choose to paint and decorate your niddy noddy using a paint that is formulated to adhere to plastic.
Robyn Wade has always been into fiber arts—from sewing to crochet to knitting. While she likes knitted clothing, she really loves to spend time knitting less practical items like body parts and inanimate objects. Robyn currently lives in Lexington, KY were she co-owns a knit and craft shop called ReBelle (www.ReBellegirls.com). She also designed The Immaculate Heart of Mary on pages 42-45.