

 |
 |
 |
 |
 |
 |
 |
 |
Raellyn Hatter (photo)
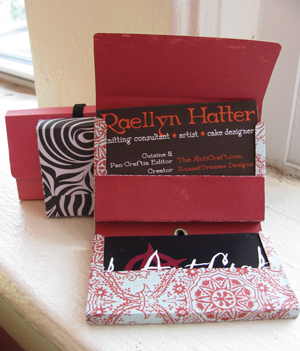
Zabet has gotten old enough that shes actually found herself saying things like, I remember when gum used to come in a simple paper wrapper! This business card holder was inspired by a surprisingly complex pack of gum she bought on a road trip. We can only assume the Japanese were involved at some point, as they seem to be at the root of anything that is both cute and functional.
Also, why should buses have all the fun?
Suggested Reading
Any story about British schoolchildren.
Difficulty
Cut and Paste
Click here for definitions of difficulty levels.
Download
US Letter Template (pdf format)
US Legal Template (pdf format)
A4 Template (pdf format)
Finished Measurements
Approximately 3.5"/9cm W x 2"/5cm H x .5"/1.25cm D
Materials
click image to enlarge
Raellyn Hatter (photo)
- 11"x6"/28cmx15.25cm piece of light cardstock or heavy paper (about 60-80lb)
- Cutting mat (optional)
- Metal ruler/clear acrylic grid ruler
- Hobby knife
- Bone folder
- Glue
- Small brush for spreading glue
- Spare stack of business cards or some other form that is .25"/7mm thick with sharp, square corners
- 5.5/14cm piece of .25-wide (7mm) braided flat elastic
- Small hammer
- Small leather punch
- One 3/8/9mm grommet
- Grommet-setting tool for 3/8/9mm grommets
Design Notes
Special thanks to Brenda and Raellyn, who led Zabet to some a-ha moments; and to Cat, Rebecca, and Becca for their thorough test-crafting.
Were going to assume here that you have picked some fancy paper that is decorated/printed on one side (the Right Side, or RS) and plain on the other (the Wrong Side, or WS). The template will be referred to the same way: the side with the printout is the RS; the blank side is the WS. We highly recommend printing out the template and folding the template itself up once before cutting your fancy paper up, just to make sure you understand how things should go.
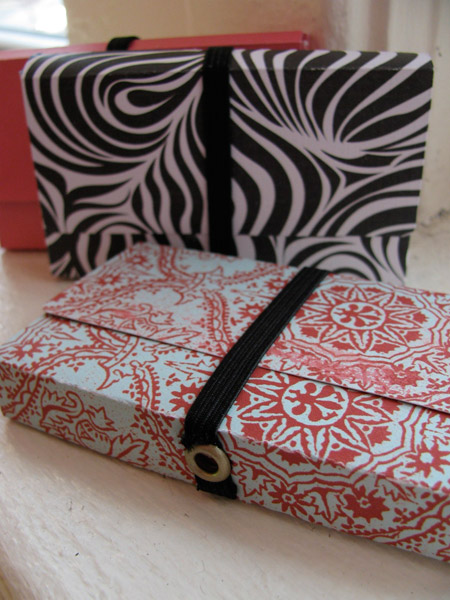
We had good success with heavy scrapbooking paper, the kind printed on both sides, which is thicker so that the print doesnt show through. It is sold in 12x12 sheets here in the U.S., which is not only enough paper for two cardholders, but gives you the opportunity to switch up the pre-printed designs between the inside and the outside.
Though were ashamed to say it, Martha Stewart Crafts® Glittering Glue worked perfectly for this project.
If you dont have a bone folder, you can use a dry pen/biro, a nutpicker, or some other blunt-pointed object for scoring, and a smooth pen/biro cap or the edge of a clean ruler for creasing.
Grommets are often sold packaged with a grommet-setting tool if you do not already have one. Check the sewing, leatherworking, and scrapbooking sections of your craft store to see what all of your size and color choices are.
Step 1: Prepare Template
Download and print out the template in the appropriate paper size. Carefully cut the template out. If you are using the Legal or A4 size template, the template will print at full size (100% scale) on one sheet of paper. If you are using the US Letter size template, you have two choices:
- Use a photocopier to enlarge it to 200% and print it onto a sheet of US Legal paper (which it fits beautifully), OR
- use a photocopier to enlarge it to 200% and print it on to two sheets of US Letter paper that you will have to attach into one template after cutting each side out.
Step 2: Cut
Place your fancy paper with the RS down on the table/cutting mat. Place the template RS down (i.e., printed side down) on top of your fancy paper. Trace shape of template and cut out your fancy paper carefully with a hobby knife and ruler. Round the corners that are marked for rounding. Reserve template for reference later.
Step 3: Prepare Paper
Prep all fold lines by scoring them with your bone folder. To accommodate the width of your scoring tool without throwing off the measurements between fold lines, use clips to secure the template on top of your fancy paper and score directly on top of the dashed lines. Score all fold lines on the WS of your fancy paper, except those marked Line 1 and Line 2. Score Line 1 and Line 2 on the RS.
Crease along all fold lines by folding fancy paper in on itself so that a fold makes WS touch WS, except Line 1 and Line 2 which should be creased so that RS touches RS. Make your creases extra-sharp by going over them with your bone folder.
Step 4: Fold and Glue
click image to enlarge
Raellyn Hatter (photo)
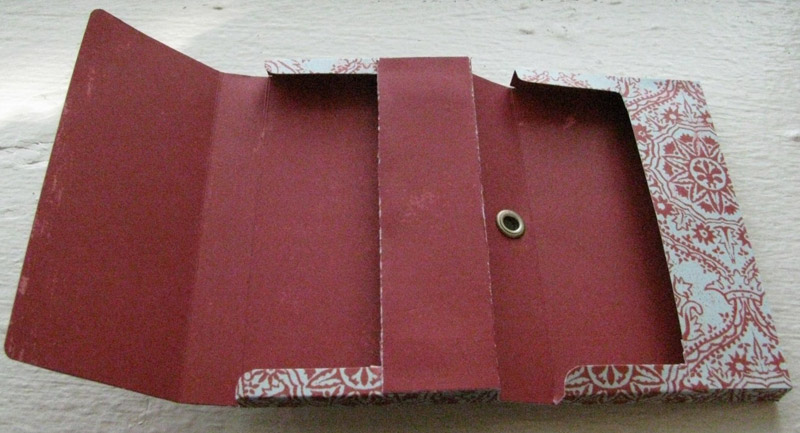
Pick up your fancy paper with WS still facing you. Find fold Line 1 in the middle and allow paper to fold along Line 1 so that RS touches RS. Notice how the RS of Flap A and Flap B (in light grey on the template) cover each other completely. Unfold, and spread glue carefully, thinly, and evenly on the RS of Flap A. Refold along Line 1 and affix the RS of Flap A to the RS of Flap B. Let glue dry before beginning the next step.
Now put together the Bottom Deck. Your fancy paper is still folded in half. Place it with the Top Deck WS down on the table and the Bottom Deck WS up, facing you. Flaps L1 and R1 should already want to fold in since you creased it in the prep. Spread a thin, even layer of glue on the RS of L1 (glue area shown in dark grey on template), fold the B1 flap up, and affix the RS of L1 to the WS of B1 to form a nice box. If you have a stack of business cards or some 1/4"/7mm thick form with sharp, square corners, using it to support these flaps makes it much easier to get everything even and square. Let dry completely and repeat with Flap R1.
Repeat to form the Top Deck with Flaps L2, R2, and B2. Notice that Flap B2 is going to be double-thick since its top edge is the fold on Line 1.
Step 5: Add a Fastener
Once all your glue is dry, you can add the elastic strap by affixing it with a grommet. You may want to practice this with scrap paper and spare elastic and grommets before you try it on your fancy paper that you just cut and folded and glued into a perfect shape.
To set the grommet, first punch holes with a hammer and leather punch in the middle of the elastic on each end, about .25/7mm from the edge. Also punch a hole in your fancy paper where Dot G shows on the template.
Place the base (smaller side) of the grommet-setting tool on a sturdy flat surface and put half a grommet on it, shank side up. Fit one hole over the shank from one end of the elastic and then the other, forming a loop. Make sure the elastic does not twist. Next, fit the hole you made in your fancy paper onto the shank, RS down. (This will push your elastic loop out of the way, dont worry about that.) Last, put the second half of the grommet on, shank side down. Put the top of the grommet-setting tool on top of this, and give it a few sharp taps with a hammer until the grommet is fully sandwiched.
Voila!
Your Amazing Doubledecker Card Holder is now ready for business! Will it wear out? Of course, eventually, though it is surprisingly sturdy. But by then youll have found yourself enamored with a whole new design scheme and will want to make a new one anyway.
Zabets card holder holds 22 of her "day job" cards in the Top Deck, which are slightly cheap and crappy, and 17 of her cards from The AntiCraft in the Bottom Deck, which are much thicker and nicer. Your mileage may vary.
About
 contact Zabet:
• legal info
contact Zabet:
• legal info
![]()
home • antifesto • this issue • archive • submit • errata • masthead • contact us • legal