

 |
Beltane 2007 |
 |
 |
 |
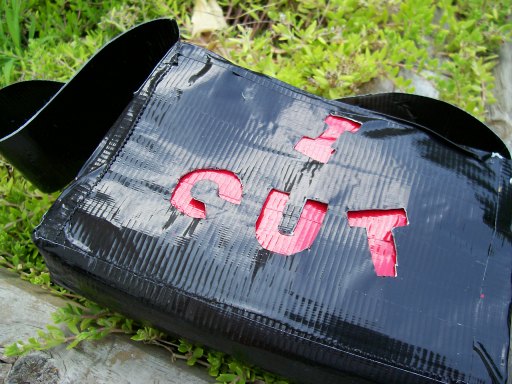
midnight in the grove > i cut > surprise: lavender lemonade

Shannon Mock (photo)
(click image to enlarge)
If you haven't heard, cutting is all the rage. Some do it privately and others advertise it. Then there are the ones of us who only cut duct tape, fabric, and paper - we will be able to cut all we want! Now you can poke fun at the emos or pass off your cry for help as a joke while you show off this ironic purse off at the mall.
Suggested Listening
"Emo Kid" Music Pimp$
by Adam and Andrew
"Bad Habit" The Dresden Dolls
by The Dresden Dolls
Difficulty
Boy Scout Dropout
Click here for definitions of difficulty levels.
Finished Measurements
7"W x 5"H x 2"D
Download
I Cut Stencils (pdf format)
Materials
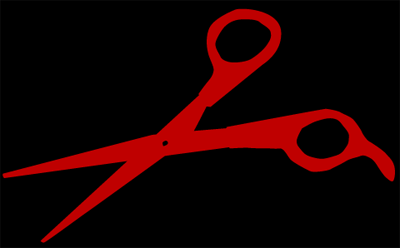
scissors stencil also provided
click image to enlarge
- Scissors
- Hobby knife
- Black duct tape
- Red duct tape
- Pen
- Ruler
- Clear packaging tape
- Gray duct tape (optional)
Project Notes
Make blocks of tape by placing a strip of colored duct tape sticky side up on a flat surface. Place the next strip sticky side up halfway on top of the first. Repeat until the block is as big as you need. Then use the grey/silver duct tape (which is more economical) to cover the sticky side of the block by layering strips as described above. Although on small projects it doesn't matter that much to use the gray on the other side. Get your materials ready and have a clean flat surface.
Directions
Shannon Mock (photo)
click image to enlarge
Step 1:
Make two blocks of black with the measurements of 7" x 5". Using the I CUT stencil (or your bravery with writing block letters) trace and cut out the words I CUT on one block. On the other block use the scissors stencil (or trace your own scissors) and cut out the scissors image.
Step 2:
Make two blocks of the same size in red. Tape these to the black. Cut some black circles out of the uncovered tape (very hard and sticky to do. Place on the area of scissors that need the handle holes.
Step 3:
Now, this is tricky. The sides will only be using one strip of tape. Sometimes it is hard to get these strips perfect. Make strips of these lengths: Two 5" strips and one 7" strip.
Step 4:
Attach these by ripping tape in half that are 7" long. Now, you have two pieces. You will connect the bottom strip that measures 7" to the 7" black/red block. Now, as you have the two pieces propped up, place one of the strips on the front and the other in the back. Now, you will repeat this until you have a 3-D object. The 7" pieces connect to the 7" pieces and the 5" pieces connect to the 5" pieces. After those pieces are connect, place tape on the 1" corners on the outside and inside.
Step 5:
Now, this strap is the same width as sides. Make a piece of covered duct tape in black 24" long. Attach to the sides by taping it a couple times. Make sure to tape well so it will not slip off, and also make sure you haven't twisted the straps.
Finishing:
Feel free to go over edges with more duct tape to finish them and make them look more professional. Cover with clear packaging tape over the letters and image. Clear duct tape has lines on it which makes it cloudy and look cheap and icky.
About
![]()
home • antifesto • archive • errata • masthead • angstylvania • legal